Gain insights from text and image files using Search and AI
Enabling users to find the right information quickly is critical in many applications, and knowing how to deliver this information is a valuable skill. Throughout this document, we will provide an introduction to the Cognitive Search pattern and how you, as a developer, can leverage the Microsoft Azure platform to implement this pattern in your applications, adding context, accuracy, and intelligence to your enterprise search capabilities.
Driven by advancements in cloud technologies and artificial intelligence (AI), Cognitive Search represents the evolution of enterprise search. Using AI, we are able to extract more insightful information by sorting, categorizing, and structuring content based on context and patterns within documents, and better understand user intent to correctly assert the most relevant documents. Cognitive Search returns results that are more relevant to users, and creates new experiences exploring the data.
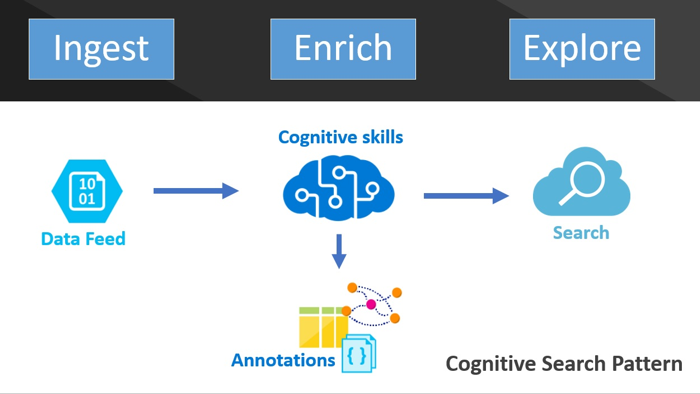
JFKFiles Cognitive Search Pattern
In the JFK Files scenario below, we will explore how you can leverage Azure Cognitive Services and Search to implement the Cognitive Search pattern in an application, using the recently released documents from The President John F. Kennedy Assassination Records Collection.
The JFK Files sample customer scenario
On November 22nd, 1963, the President of the United States, John F. Kennedy, was assassinated. The official report was that he was shot by a lone gunman, named Lee Harvey Oswald, while driving through the streets of Dallas in his motorcade. His assassination, however, is surrounded by endless conspiracy theories, and has been the subject of so much controversy that, in 1992, an act of Congress mandated that all documents related to the assassination be released by the year 2017. As of December 2017, almost 35,000 documents totaling more than 337,000 pages have been released.
Everyone is curious to know what information is contained within these documents, but it would take decades to read through that many documents. In this scenario, we look at how Azure Search, Cognitive Services, and a handful of other Azure services can be leveraged by developers to extract knowledge and gain insights from this deluge of documents, using a continuous process that ingests raw documents, enriching them into structured information that enables easier exploration of the underlying data.
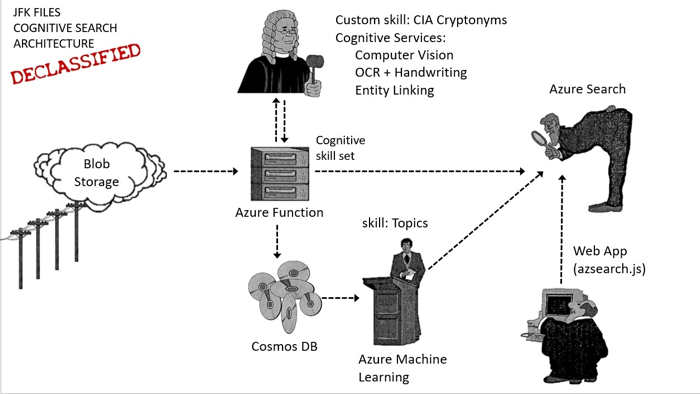
JFKFiles Overview
Let's explore how we went about building an AI pipeline, and extracting insights from the JFK Files by walking through code samples and interactive sections that will allow you to see the results of executing the code.
- Ingesting documents into the AI pipeline
- Automatically create tags for people, places and organizations using named entity recognition
- Read text in images
- Read handwritten text in images
- Insights from images as well as text
- Supporting tags to refine Search queries
- Explore relationships between identified entities
- Highlighting matched text in search results
- Uncover insights by combining external knowledge
- Create the Search index
Ingesting documents into the AI pipeline
To continuously ingest and enrich the JFK Files, we created an Azure Function. Azure Functions is a serverless compute service that enables you to run code on-demand without having to explicitly provision or manage infrastructure. To learn more, see An introduction to Azure Functions.
Azure Functions can be used to run a script or piece of code in response to a variety of events. In this case, the triggering event is a document being uploaded into an Azure Blob Storage account. As documents are added, our Function is triggered, and begins executing its code to enrich text extracted from images via optical character recognition (OCR), handwriting, and image captioning.
To demonstrate a more developer-centric approach to creating Azure Functions, let's look at how you can use Visual Studio 2017 to create a Function. For this, you will use the Azure Functions Tools for Visual Studio, which is included in the Azure development workload in the Visual Studio 2017 installation. After creating an Azure Function project, you will add the following code to the Function's Run method.
public static async Task Run(Stream blobStream, string name, TraceWriter log)
{
    log.Info($"Processing blob\n Name:{name} \n Size: {blobStream.Length} Bytes");

                    // Parse the incoming document to extract images
    IEnumerable<PageImage> pages = DocumentParser.Parse(blobStream).Pages;

                    // Create and apply the skill set to create annotations
    SkillSet<PageImage> skillSet = CreateCognitiveSkillSet();
                    var annotations = await skillSet.ApplyAsync(pages);

                    // Commit them to Cosmos DB
    await cosmosDb.SaveAsync(annotations);

                    // Index the annotated document with Azure Search
    AnnotatedDocument document = new AnnotatedDocument(annotations.Select(a => a.Get<AnnotatedPage>("page-metadata")));
                    var searchDocument = new SearchDocument(name)
    {
        Metadata = document.Metadata,
        Text = document.Text,
        LinkedEntities = annotations
                .SelectMany(a => a.Get<EntityLink[]>("linked-entities") ?? new EntityLink[0])
                .GroupBy(l => l.Name)
                .OrderByDescending(g => g.Max(l => l.Score))
                .Select(l => l.Key)
                .ToList(),
    };
                    var batch = IndexBatch.MergeOrUpload(new[] { searchDocument });
                    var result = await indexClient.Documents.IndexAsync(batch);

                    if (!result.Results[0].Succeeded)
        log.Error($"index failed for {name}: {result.Results[0].ErrorMessage}");
}
In the code above, the Function receives a Stream for each file uploaded to the associated Blob storage account. Each file is parsed using a PdfReader to extract images of each page in the document. Those pages are then sent into a method which handles the extraction of data from the documents. Finally, the annotated documents are saved to Azure Cosmos DB, and added to the Azure Search Index.
In the CreateCognitiveSkillSet method, shown below, you handle passing document images into the Computer Vision APIs for analysis.
public static SkillSet<PageImage> CreateCognitiveSkillSet()
{
                    var skillSet = SkillSet<PageImage>.Create("page", page => page.Id);

                    // prepare the image
                    var resizedImage = skillSet.AddSkill("resized-image",
        page => page.GetImage().ResizeFit(2000, 2000).CorrectOrientation().UploadMedia(blobContainer),
        skillSet.Input);

                    // Run OCR on the image using the Vision API
                    var cogOcr = skillSet.AddSkill("ocr-result",
        imgRef => visionClient.RecognizeTextAsync(imgRef.Url),
        resizedImage);

                    // extract text from handwriting
                    var handwriting = skillSet.AddSkill("ocr-handwriting",
        imgRef => visionClient.GetHandwritingTextAsync(imgRef.Url),
        resizedImage);

                    // Get image descriptions for photos using the computer vision
                    var vision = skillSet.AddSkill("computer-vision",
        imgRef => visionClient.AnalyzeImageAsync(imgRef.Url, new[] { VisualFeature.Tags, VisualFeature.Description }),
        resizedImage);

                    // extract entities linked to wikipedia using the Entity Linking Service
                    var linkedEntities = skillSet.AddSkill("linked-entities",
        (ocr, hw, vis) => GetLinkedEntitiesAsync(ocr.Text, hw.Text, vis.Description.Captions[0].Text),
        cogOcr, handwriting, vision);

                    // combine the data as an annotated document
                    var cryptonyms = skillSet.AddSkill("cia-cryptonyms",
        ocr => DetectCIACryptonyms(ocr.Text),
        cogOcr);

                    // combine the data as an annotated page that can be used by the UI
                    var pageContent = skillSet.AddSkill("page-metadata",
        CombineMetadata,
        cogOcr, handwriting, vision, cryptonyms, linkedEntities, resizedImage);

                    return skillSet;
}
Try out uploading documents, and triggering the function...
Select a document to upload:
As you have seen in the code above, the Azure Function orchestrates the enrichment of ingested documents, as well as saving them to Cosmos DB and adding them to the Azure Search Index. Below, we will explore in more detail how this is accomplished.
Automatically create tags for people, places and organizations using named entity recognition
As files are consumed by the Azure Function, the first step in enrichment the process is sorting and categorizing the data contained within those files. The ability to quickly navigate and refine search is greatly enhanced through the use of tags, so we want to generate a tag list that looks similar to the following:
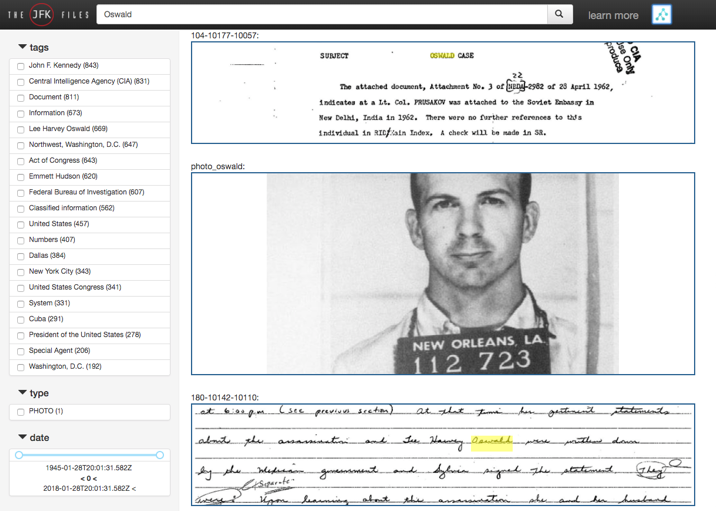
JFKFiles Tag List
On the left, you can see that the documents are broken down by the entities that were extracted from them. Already, we know these documents are related to JFK, the CIA, and the FBI. To create this searchable tag index, we can leverage the Cognitive Services Computer Vision APIs. The cloud-based Computer Vision API provides developers with access to advanced algorithms for processing images and returning information. By uploading an image or specifying an image URL, Microsoft Computer Vision algorithms can analyze visual content in different ways based on inputs and user choices. To get started, view the Computer Vision documentation.
Read text in images
Recognizing text in images requires the use of OCR technology, which is one of the API endpoints provided by Computer Vision. OCR detects text within images, and extracts the recognized words into a machine-readable character stream. Using this feature, you can analyze images to detect embedded text, generate character streams, and enable searching.
Prior to using Cognitive Services Computer Vision, you must sign up for an API Key. To begin writing code against the Computer Vision API, you can either use an HttpClient to call the APIs, or you can install the Microsoft.ProjectOxford.Vision NuGet package, add using statements for Microsoft.ProjectOxford.Vision and Microsoft.ProjectOxford.Vision.Contract, and create a VisionServiceClient.
Here, within our Web API VisionController, we make use of an HttpClient to call the APIs at the OCR endpoint, passing in an image to be analyzed.
const string subscriptionKey = "[YOUR SUBSCRIPTION KEY]";
const string uriBase = "https://[YOUR REGION].api.cognitive.microsoft.com/vision/v1.0/ocr";

[HttpGet("AnalyzeText/{image}")]
public async Task<IActionResult> AnalyzeText(string image)
{
                    var result = await GetTextAnalysisResult(image);
                    return Ok(result);
}

private Task<IActionResult> GetTextAnalysisResult(string image)
{
    HttpClient client = new HttpClient();

                    // Request headers.
    client.DefaultRequestHeaders.Add("Ocp-Apim-Subscription-Key", subscriptionKey);

                    // Request parameters.
                    string requestParameters = "language=unk&detectOrientation=true";

                    // Assemble the URI for the REST API Call.
                    string uri = uriBase + "?" + requestParameters;

    HttpResponseMessage response;

                    // Request body. Posts a locally stored JPEG image.
                    byte[] byteData = GetImageAsByteArray(image);

                    using (ByteArrayContent content = new ByteArrayContent(byteData))
    {
                    // This example uses content type "application/octet-stream".
                    // The other content types you can use are "application/json" and "multipart/form-data".
        content.Headers.ContentType = new MediaTypeHeaderValue("application/octet-stream");

                    // Execute the REST API call.
        response = await client.PostAsync(uri, content);

                    // Get the JSON response.
                    string contentString = await response.Content.ReadAsStringAsync();

                    // Display the JSON response.
        Console.WriteLine("\nResponse:\n");
        Console.WriteLine(JsonPrettyPrint(contentString));
    }
}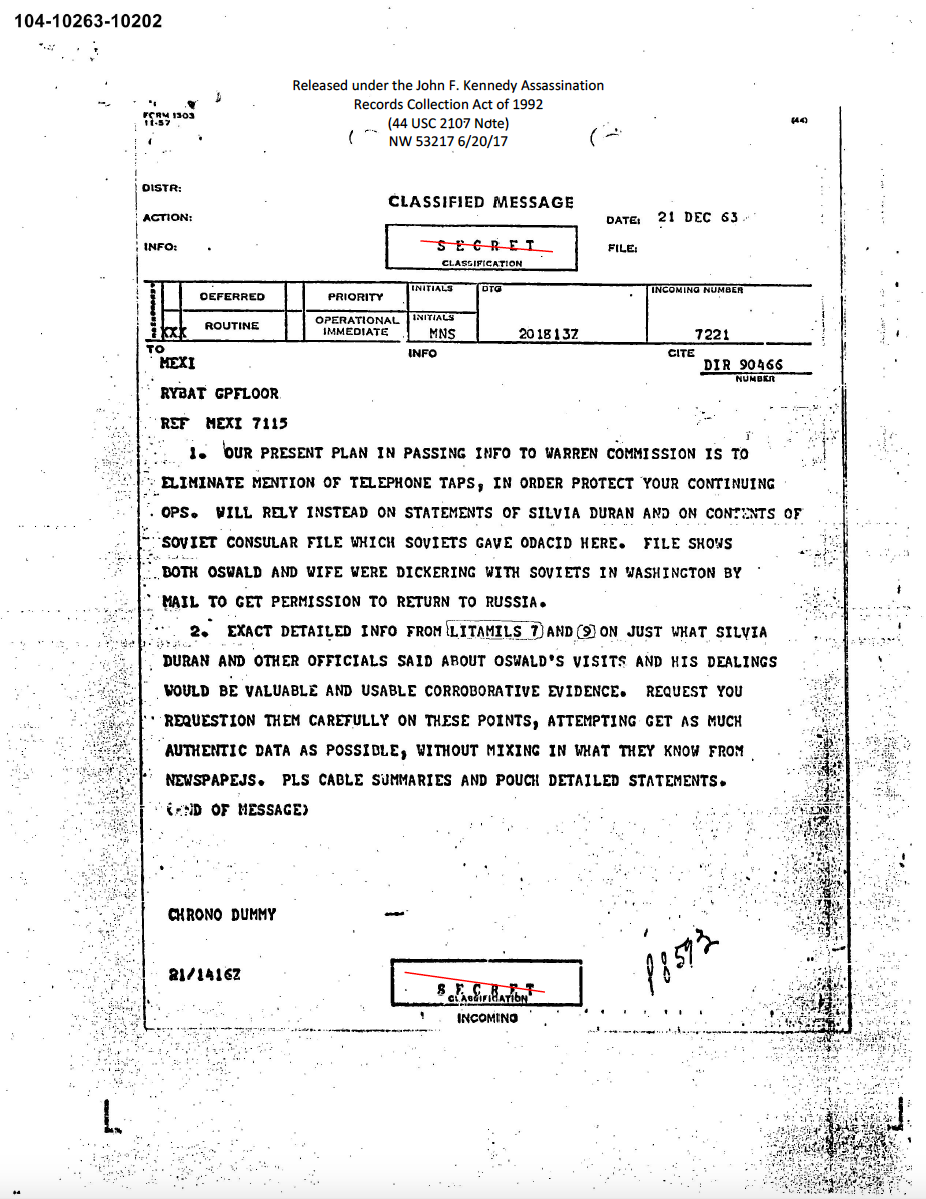
Sample Document Image
Below is an abbreviated snippet of the JSON document that is returned when passing the above image into our AnalyzeText method.
{
                    "textAngle": 0.0,
                    "orientation": "NotDetected",
                    "language": "en",
                    "regions": [
                    {
                    "boundingBox": "293,79,311,130",
                    "lines": [
                    {
                    "boundingBox": "293,79,311,14",
                    "words": [
                    {
                    "boundingBox": "293,79,54,12",
                    "text": "Released"
                    },
                    {
                    "boundingBox": "352,79,37,12",
                    "text": "under"
                    },
                    {
                    "boundingBox": "392,79,21,12",
                    "text": "the"
                    },
                    {
                    "boundingBox": "416,79,28,12",
                    "text": "John"
                    },
                    {
                    "boundingBox": "450,80,9,10",
                    "text": "F."
                    },
                    {
                    "boundingBox": "464,79,53,14",
                    "text": "Kennedy"
                    },
                    {
                    "boundingBox": "521,80,83,11",
                    "text": "Assassination"
                    }
          ]
                    },
                    {
                    "boundingBox": "354,98,189,12",
                    "words": [
                    {
                    "boundingBox": "354,98,49,12",
                    "text": "Records"
                    },
                    {
                    "boundingBox": "407,98,61,12",
                    "text": "Collection"
                    },
                    {
                    "boundingBox": "472,99,21,10",
                    "text": "Act"
                    },
                    {
                    "boundingBox": "497,98,13,12",
                    "text": "Of"
                    },
                    {
                    "boundingBox": "513,99,30,11",
                    "text": "1992"
                    }
          ]
                    }
      ]
                    }
  ]
}
Notice in the above result set that we not only get the text back, but also a bounding box representing the coordinates of each word in the source image. This bounding box information will come in handy later when we want to highlight the matches visually in the search results.
Try out reading text in images
Select an image below, and view the Text Analysis results...
Select an image to analyze:
Read handwritten text in images
In addition to typed text, throughout the JFK Files there are thousands of handwritten notes, whether added as comments to documents, or written entirely by hand, so the ability to digitize these notes, and make them searchable greatly enhances the overall effectiveness of our search index.
Handwritten OCR technology allows you to detect and extract handwritten text from notes, letters, essays, whiteboards, forms, etc. It works with different surfaces and backgrounds, such as white paper, yellow sticky notes, and whiteboards.
Handwritten text recognition saves time and effort and can make you more productive by allowing you to take images of text, rather than having to transcribe it. It makes it possible to digitize notes, which then allows you to implement quick and easy search. It also reduces paper clutter.
Note: This technology is currently in preview and is only available for English text.
As above, these methods would be added to the VisionController, to provide the ability to perform OCR on handwritten text.
const string subscriptionKey = "[YOUR SUBSCRIPTION KEY]";
const string uriBase = "https://[YOUR REGION].api.cognitive.microsoft.com/vision/v1.0/recognizeText";

[HttpGet("AnalyzeHandwriting/{image}")]
public async Task<IActionResult> AnalyzeHandwriting(string image)
{
                    var result = await GetHandwritingAnalysisResult(image);
                    return Ok(result);
}

private Task<IActionResult> GetHandwritingAnalysisResult(string image)
{
    HttpClient client = new HttpClient();

                    // Request headers.
    client.DefaultRequestHeaders.Add("Ocp-Apim-Subscription-Key", subscriptionKey);

                    // Request parameter. Set "handwriting" to false for printed text.
                    string requestParameters = "handwriting=true";

                    // Assemble the URI for the REST API Call.
                    string uri = uriBase + "?" + requestParameters;

    HttpResponseMessage response = null;

                    // This operation requrires two REST API calls. One to submit the image for processing,
                    // the other to retrieve the text found in the image. This value stores the REST API
                    // location to call to retrieve the text.
                    string operationLocation = null;

                    // Request body. Posts a locally stored JPEG image.
                    byte[] byteData = GetImageAsByteArray(image);
    ByteArrayContent content = new ByteArrayContent(byteData);

                    // This example uses content type "application/octet-stream".
                    // You can also use "application/json" and specify an image URL.
    content.Headers.ContentType = new MediaTypeHeaderValue("application/octet-stream");

                    // The first REST call starts the async process to analyze the written text in the image.
    response = await client.PostAsync(uri, content);

                    // The response contains the URI to retrieve the result of the process.
                    if (response.IsSuccessStatusCode)
        operationLocation = response.Headers.GetValues("Operation-Location").FirstOrDefault();
                    else
    {
                    // Display the JSON error data.
        Console.WriteLine("\nError:\n");
        Console.WriteLine(JsonPrettyPrint(await response.Content.ReadAsStringAsync()));
                    return;
    }

                    // The second REST call retrieves the text written in the image.
                    //
                    // Note: The response may not be immediately available. Handwriting recognition is an
                    // async operation that can take a variable amount of time depending on the length
                    // of the handwritten text. You may need to wait or retry this operation.
                    //
                    // This example checks once per second for ten seconds.
                    string contentString;
                    int i = 0;
                    do
    {
        System.Threading.Thread.Sleep(1000);
        response = await client.GetAsync(operationLocation);
        contentString = await response.Content.ReadAsStringAsync();
        ++i;
    }
                    while (i < 10 && contentString.IndexOf("\"status\":\"Succeeded\"") == -1);

                    if (i == 10 && contentString.IndexOf("\"status\":\"Succeeded\"") == -1)
    {
        Console.WriteLine("\nTimeout error.\n");
                    return;
    }

                    // Display the JSON response.
    Console.WriteLine("\nResponse:\n");
    Console.WriteLine(JsonPrettyPrint(contentString));
}
Having created the mechanisms to extract text data from the images, let's move on to seeing how we can gain insights from images as well.
Insights from images as well as text
In addition to being able to extract text, the Analyze Images component of the Computer Vision API can be used to retrieve information about visual content found within images, providing tagging, descriptions, and domain-specific models to identity content, and label it with confidence. It also identifies image types and color schemes within them.
The following methods are part of our VisionController, and use the Analyze API of Computer Vision.
const string subscriptionKey = "[YOUR SUBSCRIPTION KEY]";
const string uriBase = "https://[YOUR REGION].api.cognitive.microsoft.com/vision/v1.0/analyze";

[HttpGet("AnalyzeImage/{image}")]
public async Task<IActionResult> AnalyzeImage(string image)
{
                    var result = await GetImageAnalysisResult(image);
                    return Ok(result);
}

private Task<IActionResult> GetImageAnalysisResult(string image)
{
    HttpClient client = new HttpClient();

                    // Request headers.
    client.DefaultRequestHeaders.Add("Ocp-Apim-Subscription-Key", subscriptionKey);

                    // Request parameters. A third optional parameter is "details".
                    string requestParameters = "visualFeatures=Categories,Description,Color&language=en";

                    // Assemble the URI for the REST API Call.
                    string uri = uriBase + "?" + requestParameters;

    HttpResponseMessage response;

                    // Request body.
                    byte[] byteData = GetImageAsByteArray(image);

                    using (ByteArrayContent content = new ByteArrayContent(byteData))
    {
                    // This example uses content type "application/octet-stream".
                    // The other content types you can use are "application/json" and "multipart/form-data".
        content.Headers.ContentType = new MediaTypeHeaderValue("application/octet-stream");

                    // Execute the REST API call.
        response = await client.PostAsync(uri, content);

                    // Get the JSON response.
                    string contentString = await response.Content.ReadAsStringAsync();

                    // Display the JSON response.
        Console.WriteLine("\nResponse:\n");
        Console.WriteLine(JsonPrettyPrint(contentString));
    }
}
Inspecting the JSON result below, you can see the image analysis returns a rich set of tags and descriptions of the content, as well as identification of faces, with a bounding box. The bounding boxes for faces can be seen overlaid on the images, where faces were detected.
{
                    "requestId": "2adb6ac0-5ba9-4018-88c1-bfc2a2e321ad",
                    "metadata": { "height": 637, "width": 511, "format": "Png" },
                    "imageType": { "clipArtType": 0, "lineDrawingType": 0 },
                    "color": {
                    "accentColor": "#414141",
                    "dominantColorForeground": "Grey",
                    "dominantColorBackground": "White",
                    "dominantColors": null,
                    "isBWImg": true
                    },
                    "adult": {
                    "isAdultContent": false,
                    "isRacyContent": false,
                    "adultScore": 0.0111795152,
                    "racyScore": 0.0180148762
                    },
                    "categories": [
                    {
                    "detail": null,
                    "name": "people_",
                    "score": 0.59765625
                    },
                    {
                    "detail": null,
                    "name": "people_portrait",
                    "score": 0.359375
                    }
    ],
                    "faces": [
                    {
                    "age": 37,
                    "gender": "Male",
                    "faceRectangle": {
                    "width": 214,
                    "height": 214,
                    "left": 135,
                    "top": 149
                    }
                    }
    ],
                    "tags": [
                    {
                    "name": "wall",
                    "confidence": 0.990005434,
                    "hint": null
                    },
                    {
                    "name": "person",
                    "confidence": 0.9802377,
                    "hint": null
                    },
                    {
                    "name": "posing",
                    "confidence": 0.518102467,
                    "hint": null
                    },
                    {
                    "name": "old",
                    "confidence": 0.5016991,
                    "hint": null
                    }
    ],
                    "description": {
                    "tags": [
                    "person",
                    "photo",
                    "man",
                    "black",
                    "front",
                    "white",
                    "sign",
                    "posing",
                    "old",
                    "looking",
                    "standing",
                    "holding",
                    "young",
                    "woman",
                    "smiling",
                    "boy",
                    "wearing",
                    "shirt"
        ],
                    "captions": [
                    {
                    "text": "a black and white photo of Lee Harvey Oswald",
                    "confidence": 0.901829839
                    }
        ]
                    }
}
Try out analyzing an image...
Select an image below, and view the Image Analysis results...
Select an image to analyze:
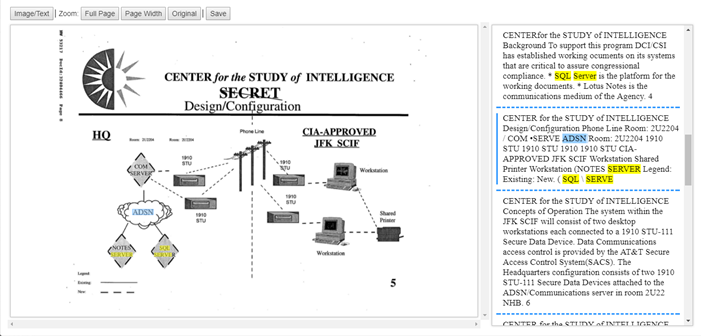
A fun fact we learned by using the Computer Vision APIs is that the government was actually using SQL Server and a secured architecture to manage these documents in 1997, as seen in the architecture diagram below.
JFKFiles SQL Server Located within an Image
Explore relationships between identified entities
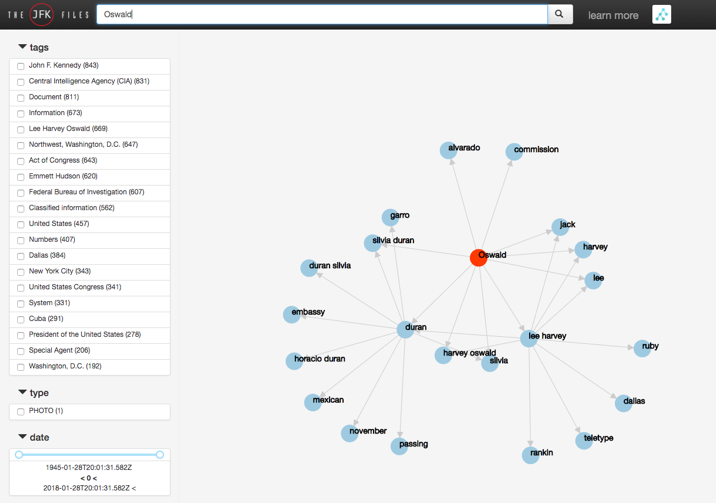
Now that we've extracted tags from the JFK files, let's look at how we can leverage the tags we created above to explore relationship between the identified entities. Below is the visualization of what happened when we searched this index for “Oswald.”
JFKFiles Entity Graph
On the client-side, we are going to use d3js to handle the graphical display of relationships. To get the data in the shape required by d3js, Let's start with the server-side code to accomplish this. On the server-side, we created another Web API with the GetFDNodes endpoint.
[HttpGet]
public JObject GetFDNodes(string q)
{
                    // Calculate nodes for 3 levels
    JObject dataset = new JObject();
                    int MaxEdges = 20;
                    int MaxLevels = 3;
                    int CurrentLevel = 1;
                    int CurrentNodes = 0;

                    var FDEdgeList = new List<FDGraphEdges>();
                    // Create a node map that will map a facet to a node - nodemap[0] always equals the q term
                    var NodeMap = new Dictionary<string, int>();
    NodeMap[q] = CurrentNodes;

                    // If blank search, assume they want to search everything
                    if (string.IsNullOrWhiteSpace(q))
        q = "*";

                    var NextLevelTerms = new List<string>();
    NextLevelTerms.Add(q);

                    // Iterate through the nodes up to 3 levels deep to build the nodes or when I hit max number of nodes
                    while ((NextLevelTerms.Count() > 0) && (CurrentLevel <= MaxLevels) && (FDEdgeList.Count() < MaxEdges))
    {
        q = NextLevelTerms.First();
        NextLevelTerms.Remove(q);
                    if (NextLevelTerms.Count() == 0)
            CurrentLevel++;
                    var response = _docSearch.GetFacets(q, 10);
                    if (response != null)
        {
            var facetVals = ((FacetResults)response.Facets)["terms"];
                    foreach (var facet in facetVals)
            {
                    int node = -1;
                    if (NodeMap.TryGetValue(facet.Value.ToString(), out node) == false)
                {
                    // This is a new node
                    CurrentNodes++;
                    node = CurrentNodes;
                    NodeMap[facet.Value.ToString()] = node;
                }
                    // Add this facet to the fd list
                    if (NodeMap[q] != NodeMap[facet.Value.ToString()])
                {
                    FDEdgeList.Add(new FDGraphEdges { source = NodeMap[q], target = NodeMap[facet.Value.ToString()] });
                    if (CurrentLevel < MaxLevels)
                        NextLevelTerms.Add(facet.Value.ToString());
                }
            }
        }
    }

    JArray nodes = new JArray();
                    foreach (var entry in NodeMap)
    {
        nodes.Add(JObject.Parse("{name: \"" + entry.Key.Replace("\"", "") + "\"}"));
    }

    JArray edges = new JArray();
                    foreach (var entry in FDEdgeList)
    {
        edges.Add(JObject.Parse("{source: " + entry.source + ", target: " + entry.target + "}"));
    }

    dataset.Add(new JProperty("edges", edges));
    dataset.Add(new JProperty("nodes", nodes));

                    // Create the fd data object to return
                    return dataset;
}
The GetFDNodes method retrieves the facets from the search index, and returns the data structured as shown below.
{
                    "edges": [
                    { "source": 0, "target": 1 },
                    { "source": 0, "target": 2 },
                    { "source": 0, "target": 3 },
                    { "source": 0, "target": 4 },
                    { "source": 0, "target": 5 },
                    { "source": 0, "target": 6 },
                    { "source": 0, "target": 7 },
                    { "source": 0, "target": 8 },
                    { "source": 0, "target": 9 },
                    { "source": 0, "target": 10 },
                    { "source": 1, "target": 4 },
                    { "source": 1, "target": 5 },
                    { "source": 1, "target": 11 },
                    { "source": 1, "target": 12 },
                    { "source": 1, "target": 13 },
                    { "source": 1, "target": 14 },
                    { "source": 1, "target": 15 },
                    { "source": 1, "target": 16 },
                    { "source": 1, "target": 17 },
                    { "source": 2, "target": 3 },
                    { "source": 2, "target": 6 },
                    { "source": 2, "target": 10 },
                    { "source": 2, "target": 18 },
                    { "source": 2, "target": 1 },
                    { "source": 2, "target": 19 },
                    { "source": 2, "target": 9 },
                    { "source": 2, "target": 20 },
                    { "source": 2, "target": 21 }
    ],
                    "nodes": [
                    { "name": "oswald" },
                    { "name": "duran" },
                    { "name": "lee harvey" },
                    { "name": "harvey oswald" },
                    { "name": "silvia" },
                    { "name": "silvia duran" },
                    { "name": "harvey" },
                    { "name": "alvarado" },
                    { "name": "commission" },
                    { "name": "jack" },
                    { "name": "lee" },
                    { "name": "mexican" },
                    { "name": "duran silvia" },
                    { "name": "embassy" },
                    { "name": "passing" },
                    { "name": "november" },
                    { "name": "garro" },
                    { "name": "horacio duran" },
                    { "name": "dallas" },
                    { "name": "rankin" },
                    { "name": "teletype" },
                    { "name": "ruby" }
    ]
}
With the data returned from our API, we implemented the following client-side code, using d3js. D3.js is a free JavaScript library for manipulating doucments based on data.
var w = 700;
var h = 600;
var linkDistance = 100;

var colors = d3.scale.category10();

var dataset = {};

function LoadFDGraph(data) {
    dataset = data;

                    $("#fdGraph").html('');
                    var svg = d3.select("#fdGraph").append("div").classed("svg-container", true).append("svg").attr("preserveAspectRatio", "xMinYMin meet").attr("viewBox", "0 0 690 590").classed("svg-content-responsive", true);

                    var force = d3.layout.force()
        .nodes(dataset.nodes)
        .links(dataset.edges)
        .size([w, h])
        .linkDistance([linkDistance])
        .charge([-1000])
        .theta(0.9)
        .gravity(0.05)
        .start();

                    var edges = svg.selectAll("line")
        .data(dataset.edges)
        .enter()
        .append("line")
        .attr("id", function (d, i) { return 'edge' + i })
        .attr('marker-end', 'url(#arrowhead)')
        .style("stroke", "#ccc")
        .style("pointer-events", "none");

                    var nodes = svg.selectAll("circle")
        .data(dataset.nodes)
        .enter()
        .append("circle")
        .attr({ "r": 15 })
        .style("fill", function (d, i) {
                    if (i == 0)
                    return "#FF3900";
                    else
                    return "#9ECAE1";
                    })
        .call(force.drag)

                    var nodelabels = svg.selectAll(".nodelabel")
        .data(dataset.nodes)
        .enter()
        .append("text")
        .attr({
                    "x": function (d) { return d.x; },
                    "y": function (d) { return d.y; },
                    "class": "nodelabel",
                    "stroke": "black"
                    })
        .text(function (d) { return d.name; });

                    var edgepaths = svg.selectAll(".edgepath")
        .data(dataset.edges)
        .enter()
        .append('path')
        .attr({
                    'd': function (d) { return 'M ' + d.source.x + ' ' + d.source.y + ' L ' + d.target.x + ' ' + d.target.y },
                    'class': 'edgepath',
                    'fill-opacity': 0,
                    'stroke-opacity': 0,
                    'fill': 'blue',
                    'stroke': 'red',
                    'id': function (d, i) { return 'edgepath' + i }
                    })
        .style("pointer-events", "none");

                    svg.append('defs').append('marker')
        .attr({
                    'id': 'arrowhead',
                    'viewBox': '-0 -5 10 10',
                    'refX': 25,
                    'refY': 0,
                    'orient': 'auto',
                    'markerWidth': 10,
                    'markerHeight': 10,
                    'xoverflow': 'visible'
                    })
        .append('svg:path')
        .attr('d', 'M 0,-5 L 10 ,0 L 0,5')
        .attr('fill', '#ccc')
        .attr('stroke', '#ccc');

                    force.on("tick", function () {
                    edges.attr({
                    "x1": function (d) { return d.source.x; },
                    "y1": function (d) { return d.source.y; },
                    "x2": function (d) { return d.target.x; },
                    "y2": function (d) { return d.target.y; }
                    });

                    nodes.attr({
                    "cx": function (d) { return d.x; },
                    "cy": function (d) { return d.y; }
                    });

                    nodelabels.attr("x", function (d) { return d.x; })
            .attr("y", function (d) { return d.y; });

                    edgepaths.attr('d', function (d) {
                    var path = 'M ' + d.source.x + ' ' + d.source.y + ' L ' + d.target.x + ' ' + d.target.y;
                    return path
                    });
                    });
};
The final step, is to call the API, and load the data into our graphical display.
getFDNodes = function (q) {
                    return $.ajax({
                    url: 'api/graph/FDNodes/' + q,
                    method: 'GET'
                    }).then(data => {
                    LoadFDGraph(data);
                    self.graphComplete(true);
                    }, error => {
                    alert(error.statusText);
                    });
}
Try out visualizing the data and relationships...
Select a search term, below, and view the Graph results...
Below is a drop down containing several key words associated with the assination of JFK. Select one to pass it into Search, and generate a visual relations graph:
Select a search term:
Supporting tags to refine Search queries
We currently have the ability to query via full text search, but recall we also wanted the ability to automatically present the users with a list of tags to choose from in refining their search.
After we execute the initial search, we are provided with information about the various facets available in the resulting document collection. These facets can be used by the user to narrow the selected documents even further.
Let's examine what facets are available in the JSON returned by our query:
"@search.facets": {
                    "people@odata.type": "#Collection(Microsoft.Azure.Search.V2016_09_01.QueryResultFacet)",
                    "people": [],
                    "places@odata.type": "#Collection(Microsoft.Azure.Search.V2016_09_01.QueryResultFacet)",
                    "places": [],
                    "tags@odata.type": "#Collection(Microsoft.Azure.Search.V2016_09_01.QueryResultFacet)",
                    "tags": [
                    {
                    "count": 843,
                    "value": "John F. Kennedy"
                    },
                    {
                    "count": 831,
                    "value": "Central Intelligence Agency (CIA)"
                    },
                    {
                    "count": 811,
                    "value": "Document"
                    },
                    {
                    "count": 673,
                    "value": "Information"
                    },
                    {
                    "count": 669,
                    "value": "Lee Harvey Oswald"
                    },
                    {
                    "count": 647,
                    "value": "Northwest, Washington, D.C."
                    },
                    {
                    "count": 643,
                    "value": "Act of Congress"
                    },
                    {
                    "count": 620,
                    "value": "Emmett Hudson"
                    },
                    {
                    "count": 607,
                    "value": "Federal Bureau of Investigation"
                    },
                    {
                    "count": 562,
                    "value": "Classified information"
                    },
                    {
                    "count": 457,
                    "value": "United States"
                    },
                    {
                    "count": 407,
                    "value": "Numbers"
                    },
                    {
                    "count": 384,
                    "value": "Dallas"
                    },
                    {
                    "count": 343,
                    "value": "New York City"
                    },
                    {
                    "count": 341,
                    "value": "United States Congress"
                    },
                    {
                    "count": 331,
                    "value": "System"
                    },
                    {
                    "count": 291,
                    "value": "Cuba"
                    },
                    {
                    "count": 278,
                    "value": "President of the United States"
                    },
                    {
                    "count": 206,
                    "value": "Special Agent"
                    },
                    {
                    "count": 192,
                    "value": "Washington, D.C."
                    }
        ]
                    }
Using tags and count found within these facets, we can build our tags list, providing users with information about the number of instances of each tag in the search results, and allowing them to refine and explore the data using related tags.
Highlighting matched text in search results
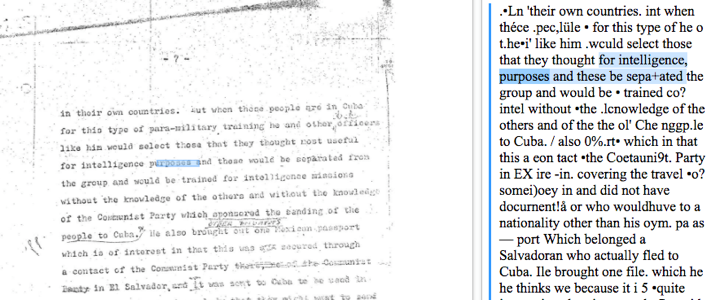
To improve the search experience, we also want to add hit highlighting to our search results. There are two forms of hit highlighting we want in the JFK Files scenario. The first is we want to highlight the match text in the text OCR results as follows:
Text hit highlighting
The second is we want to highlight the same matched text, but instead of highlighting the text in the OCR result we want to highlight the area in the image where the matched text appears.
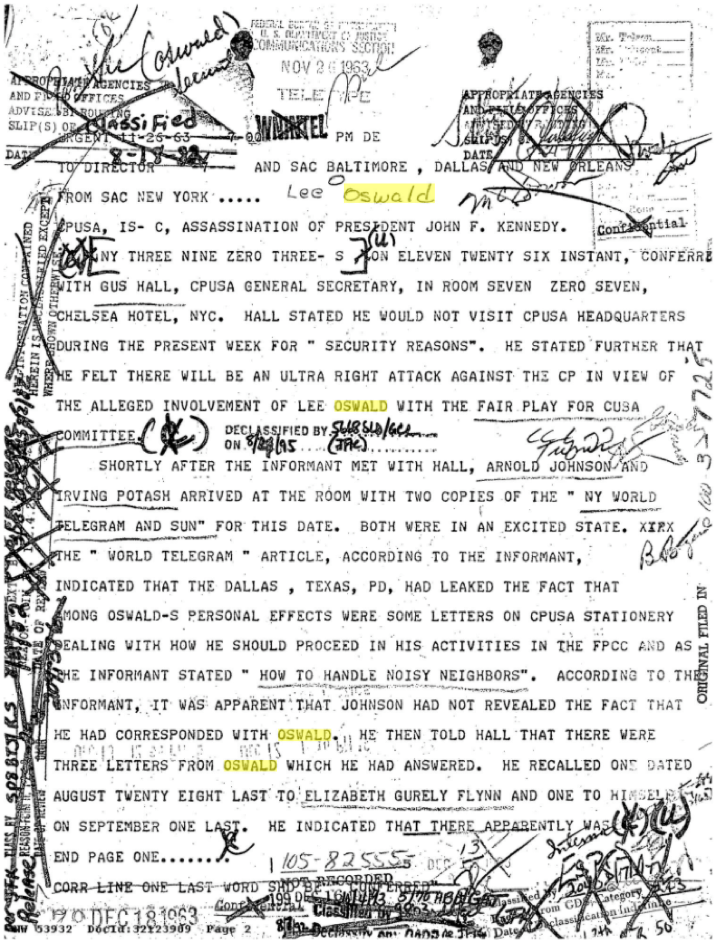
Image hit highlighting
In both cases, , we need to configure the highlight attribute with our search query results, and map the returned bounding boxes to each word:
// get all the unique highlight words
var highlights = $.unique(
    result['@search.highlights'].text
    .flatMap(function (t) { return t.match(/<em>(.+?)<\/em>/g) })
    .map(function (t) { return t.substring(4, t.length - 5).toLowerCase(); })
);
result.keywords = highlights;

// get the highlighted words
highlightsToShow = previewPage.highlightNodes
    .map(function (node) { return getHocrMetadata(node); })
    .filter(function (meta) { return meta.bbox; })
    .map(function (keywordMeta) {
                    return {
                    left: keywordMeta.bbox[0],
                    top: keywordMeta.bbox[1],
                    width: keywordMeta.bbox[2] - keywordMeta.bbox[0],
                    height: keywordMeta.bbox[3] - keywordMeta.bbox[1],
                    text: keywordMeta.text
                    };
                    });
In addition, you can control how the results are HTML formatted so you can automatically display the formatted results in a web page.
var resultTemplate =`<div>{{{id}}}: {{{title}}}</div>
{{#metadata}}
    <div style="border: #286090 solid 2px;">
    <div class="stretchy-wrapper" style="padding-bottom: {{{image.previewAspectRatio}}}%;{{{extraStyles}}}">
        <div class ="resultDescription" style="border: solid; border-width: 0px; background-image:url('{{{image.url}}}'); background-size:100%; background-position-y:{{{image.topPercent}}}%; overflow: hidden;" onclick="showDocument({{{idx}}})">
            {{#highlight_words}}

            <div class ="highlight" style="position: absolute; width: {{{widthPercent}}}%; height: {{{heightPercent}}}%; left: {{{leftPercent}}}%; top: {{{topPercent}}}%;" title="{{annotation}}" data-wikipedia="{{wikipediaUrl}}"></div>

            {{/highlight_words}}
        </div>
    </div>
    </div>
{{/metadata}}`;
Uncover insights by combining external knowledge
With the documents new searchable, entities identified and related, you are primed for the opportunity discover new insights by combining your entity data with data about those entities available in external knowledgebase. To accomplish this, we will use Microsoft's Entity Linking Intelligence Service API. It is a natural language processing tool to analyze text and link named-entities to relevant entries in a knowledge base. In the JFK Files scenario, we linked the entities to Wikipedia.
Prior to using Entity Linking Service, you must sign up for an API Key. To begin writing code against the Computer Vision API, you will need to install the Microsoft.ProjectOxford.EntityLinking NuGet package, add the required using statements, and create a EntityLinkingServiceClient.
using Microsoft.ProjectOxford.EntityLinking;
using Microsoft.ProjectOxford.EntityLinking.Contract;

namespace EnricherFunction
{
                    public class EnrichFunction
    {
                    private EntityLinkingServiceClient linkedEntityClient;

                    static EnrichFunction()
        {
            linkedEntityClient = new EntityLinkingServiceClient(Config.ENTITY_LINKING_API_KEY);
        }
    }

                    private static Task<EntityLink[]> GetLinkedEntitiesAsync(params string[] txts)
    {
                    var txt = string.Join(Environment.NewLine, txts);
                    if (string.IsNullOrWhiteSpace(txt))
                    return Task.FromResult<EntityLink[]>(null);

                    // truncate each page to 10k charactors
                    if (txt.Length > 10000)
            txt = txt.Substring(0, 10000);

                    return linkedEntityClient.LinkAsync(txt);
    }
}
// extract entities linked to wikipedia using the Entity Linking Service
var linkedEntities = GetLinkedEntitiesAsync(ocr.Text, hw.Text,
vis.Description.Captions[0].Text), cogOcr, handwriting, vision);From the client-side, you would create functions to fetch data from Wikipedia, and add highlighting for the associated terms in the data annotations.
function setupAnnotations() {
                    $('div.highlight[data-wikipedia!=""]').tooltipster({
                    content: 'Loading data from Wikipedia...',
                    theme: 'tooltipster-shadow',
                    updateAnimation: null,
                    interactive: true,
                    maxWidth: 600,
                    functionBefore: function (instance, helper) {
                    var $origin = $(helper.origin);

                    if ($origin.data('loaded') !== true) {
                    var page_id = $origin.attr("data-wikipedia");
                    fetchWiki(page_id, function (data) {
                    data.find("sup.reference").remove();
                    data.find("a").attr({ href: "" }).click(function (elem) {
                    automagic.store.setInput(elem.toElement.innerText);
                    automagic.store.search();
                    return false;
                    });
                    instance.content(data);

                    $origin.data('loaded', true);
                    });
                    }
                    }
                    });

                    $('div.highlight[title!=""]').tooltipster({
                    theme: 'tooltipster-shadow',
                    maxWidth: 400,
                    });
}

function fetchWiki(page_id, callback) {
                    $.ajax({
                    url: "https://en.wikipedia.org/w/api.php",
                    data: {
                    format: "json",
                    action: "parse",
                    page: page_id,
                    prop: "text",
                    section: 0,
                    origin: "*",
                    },
                    dataType: 'json',
                    headers: {
                    'Api-User-Agent': 'MyCoolTool/1.1 (http://example.com/MyCoolTool/; MyCoolTool@example.com) BasedOnSuperLib/1.4'
                    },
                    crossDomain: true,
                    success: function (data) {
                    var result = $(data.parse.text["*"]).find("p").first();
                    callback(result);
                    }
                    });
}
Try out linking entities in documents
Select a search term, and view the Entity Linking and hit highlighting results in the document.
Below is a drop down containing several key words found in JFK File below. Select one to generate the hit highlighting and Entity Linking for the term:
Select a keyword:

Using linking, we were even able to identify that the entity linking Cognitive Service annotated this term with a connection to Wikipedia, and we quickly realized that the Nosenko who was identified in the documents was actually a KGB defector interrogated by the CIA, and these are audio tapes of the actual interrogation. It would have taken years to figure out these connections, but thanks to the power of Azure Search and Cognitive Services we were able to accomplish this in minutes.
Create the Search index
With all the other components in place, the last thing we will look at is the Search Index. With a mechanism in place to import and process documents, we are ready to move on to incorporating the documents in an Azure Search index. Azure Search is a search-as-a-service cloud solution that gives developers APIs and tools for adding a rich search experience over your content in web, mobile, and enterprise applications. To learn more, see What is Azure Search?.
We want to make all the documents full-text searchable, which can be accomplished by adding the OCR text extracted from the documents to an Azure Search Index. An index is the primary means of organizing and searching documents in Azure Search, similar to how a table organizes records in a database. Each index has a collection of documents that all conform to the index schema (field names, data types, and properties), but indexes also specify additional constructs (suggesters, scoring profiles, and CORS configuration) that define other search behaviors. You can create an index using the Azure Portal UI, the Index Class in the SDK, or the Create Index REST API.
We only need to do this setup once, so for this example we will accomplish it using a C# console application, and the Create Index REST API.
public static class Config
{
                    /**************  UPDATE THESE CONSTANTS WITH YOUR SETTINGS  **************/
                    // Azure Search service used to index documents
                    public const string AZURE_SEARCH_SERVICE_NAME = "[Your search service name]";
                    public const string AZURE_SEARCH_ADMIN_KEY = "[Your search service key]";
                    public const string AZURE_SEARCH_INDEX_NAME = "jfkdocs";
}
The AzureSearchHelper class referenced below is a wrapper around a System.Net.Http.HttpClient, used for sending requests into the Azure Search service, and in this case, the Create Index REST API. We won't display the code for this here, but it can be found in the Microsoft.Cognitive.Skills project in the JFK Files GitHub demo solution.
using Microsoft.Cognitive.Skills;

// Instantiate a new Azure Search Helper, using the Azure Search Service name and key
var searchHelper = new AzureSearchHelper(Config.AZURE_SEARCH_SERVICE_NAME, Config.AZURE_SEARCH_ADMIN_KEY);

// Create the index
var json = File.ReadAllText(Path.Combine(AppDomain.CurrentDomain.BaseDirectory, "CreateIndex.json"));
searchHelper.Put("indexes/" + Config.AZURE_SEARCH_INDEX_NAME, json, "2016-09-01-Preview");
The CreateIndex.json file referenced above defines the structure of the index, and is shown below.
{
                    "fields": [
                    {
                    "name": "id",
                    "type": "Edm.String",
                    "searchable": true,
                    "filterable": true,
                    "retrievable": true,
                    "sortable": true,
                    "facetable": false,
                    "key": true
                    },
                    {
                    "name": "metadata",
                    "type": "Edm.String",
                    "searchable": false,
                    "filterable": false,
                    "retrievable": true,
                    "sortable": false,
                    "facetable": false
                    },
                    {
                    "name": "text",
                    "type": "Edm.String",
                    "searchable": true,
                    "filterable": false,
                    "retrievable": false,
                    "sortable": false,
                    "facetable": false,
                    "synonymMaps": [
                    "cryptonyms"
      ]
                    },
                    {
                    "name": "entities",
                    "type": "Collection(Edm.String)",
                    "searchable": false,
                    "filterable": true,
                    "retrievable": true,
                    "sortable": false,
                    "facetable": true
                    },
                    {
                    "name": "terms",
                    "type": "Collection(Edm.String)",
                    "searchable": false,
                    "filterable": true,
                    "retrievable": true,
                    "sortable": false,
                    "facetable": true
                    }
  ]
}
Finally, let's test that we can find our document by searching for some content it contains.
var indexClient = serviceClient.Indexes.GetClient(Config.AZURE_SEARCH_INDEX_NAME);
var results = indexClient.Documents.Search("oswald", new SearchParameters()
{
    Facets = new[] { "entities" },
    HighlightFields = new[] { "text" },
});
Next Steps
Investigate the mystery at the JFK Files demo website (no Azure subscription required).
Create and run your own version from JFK Files Source Code
Activate your own free Azure account
