Application Innovation through Cloud & Data
Transactional Workloads
What does it mean for your application to be cloud-based? The answer can be confusing and for developers to see for themselves usually requires a sign-up process, credit card, or other time consuming hoops to jump through. Let’s remove the friction and get right into some common scenarios and challenges developers face when building transactional applications.
The customer scenario on the next section highlights a company like most internet-based companies that exist today. They are on the verge of experiencing explosive growth, and they are uncertain about whether they can deliver. No one wants to make a bad impression on users. Especially new ones, who typically decide within seconds whether they want to use your services. Can you relate?
A lot of the focus of this interactive scenario is about making sure your database is properly set up for cloud scenarios. When you open up your application to the power of the cloud, it is very important that your database configured the best way possible so it does not become the limiting factor of your application. We also highlight several amazing database features that help you unlock the full potential of your database before you need to consider a change in your application architecture or spend a lot of time adding similar capabilities in your application code. Most of these features are available BOTH on SQL Server (on-premises) and Azure SQL DB. We will address each challenge in a way that will fix the problem, not just the symptoms.
The MyExpenses sample customer scenario
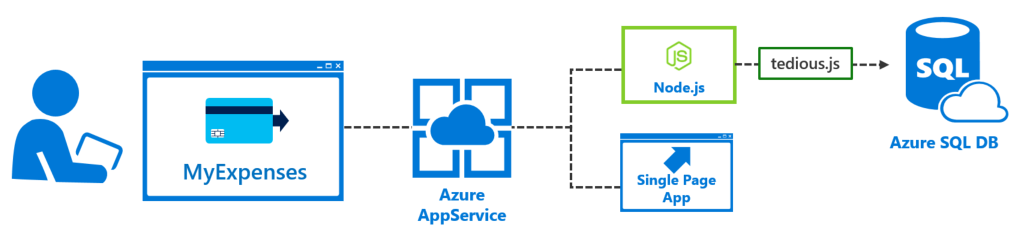
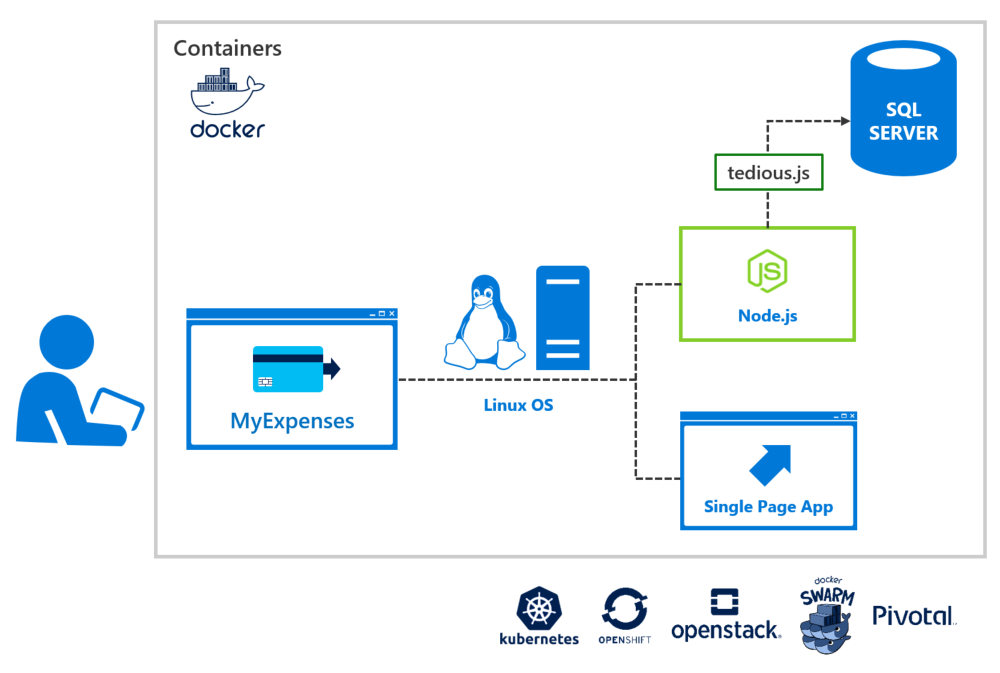
MyExpenses is an application that aims to provide a comprehensive expense tracking system for companies all over the world. Every employee can log expenses using the MyExpenses web portal and get them reimbursed in either cash or company points, which can be spent in the company store without leaving MyExpenses. Managers can do everything an employee can, but also review, approve or reject the expense reports submitted by team members.
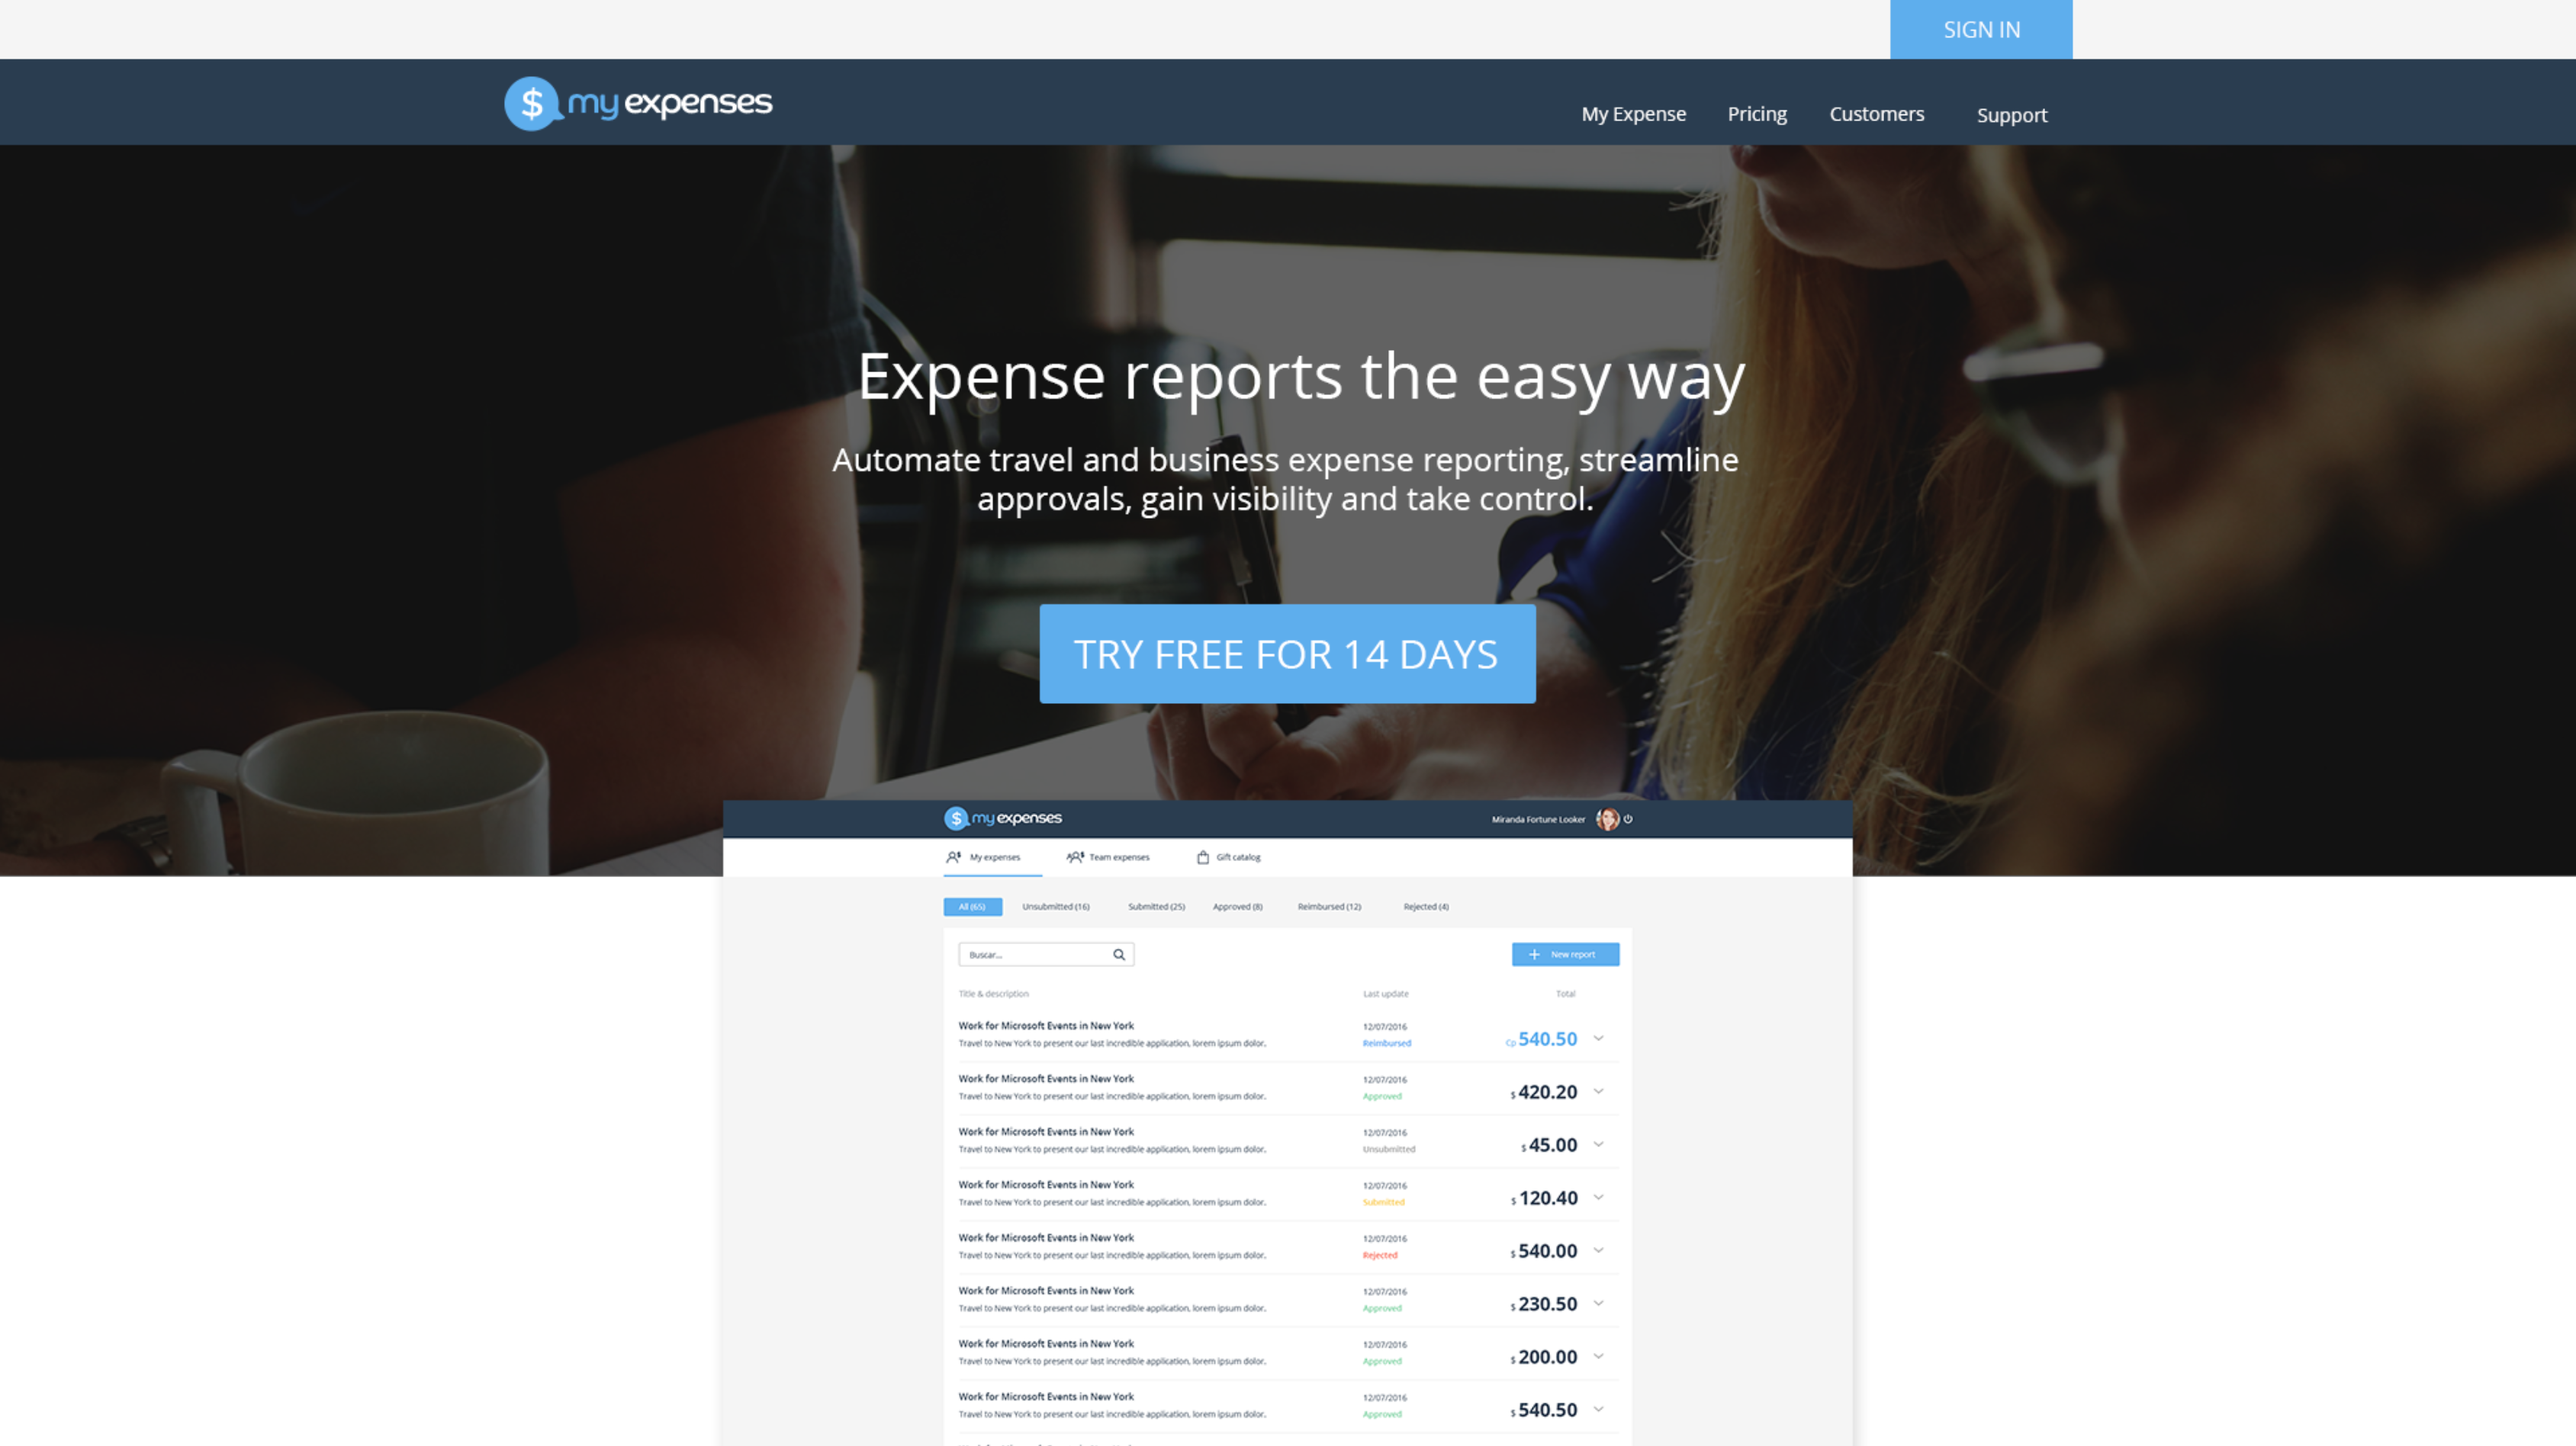
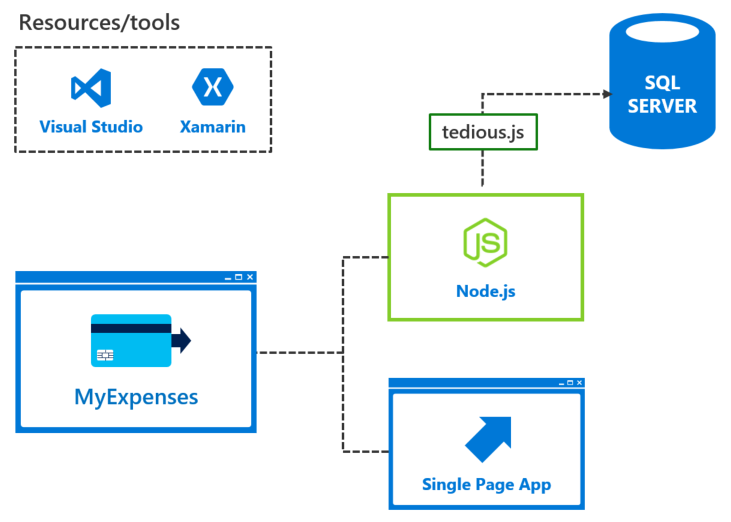
MyExpenses uses AngularJS for the frontend, Node.js for the backend, and SQL Server 2017 as the database server.
The MyExpenses development team was tasked to make improvements to the overall architecture of the application, with a focus on performance improvements, stability, and modernization. To meet these needs, the team set out to achieve the following goals:
- Moving the database to the cloud
- Benefits of an Intelligent database
- Opportunities to improve speed and resiliency
- Scale the DB on demand
- Protect your data and your brand
- Manage emerging application requirements
- Addressing Business Intelligence (BI) needs
- Sneak peak to cloud services that accelerate innovation
Moving the database to the cloud
After considering the level of effort to move their application infrastructure from on-premises to the cloud, the MyExpenses development team is unsure whether there is an easy path to just take what they have and run it on hosted VMs in Azure. There are many services in Azure, from hosted virtual machines all the way to serverless architecture options. How much of their application needs to be rearchitected? Which services should they choose to host their application components, and can they keep things secure and stable?
Migration options
We are concerned with how long it will take to migrate our environment to the cloud, or whether we'd be putting ourselves at risk.
Namely, we have two primary concerns:
- It is time-consuming and costly to migrate apps to the cloud
- There is a perceived threat of less security in the public cloud
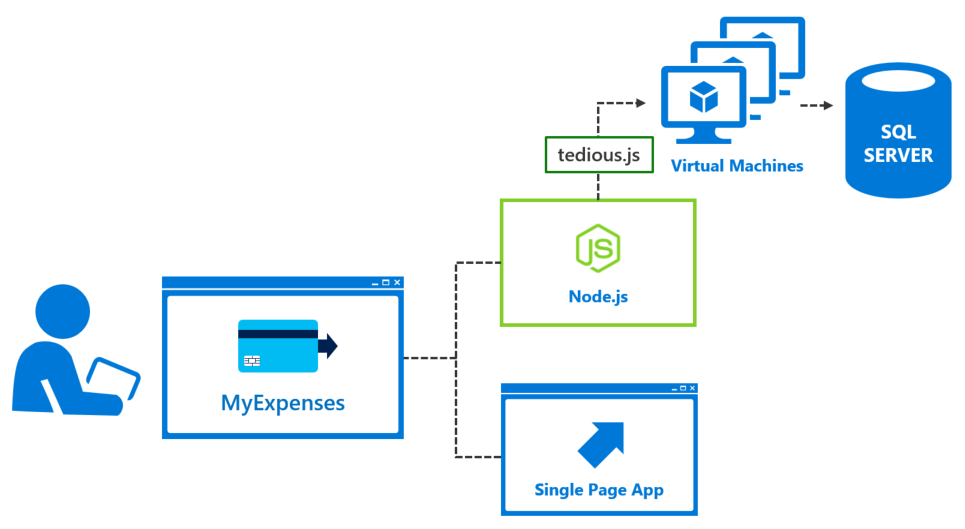
The truth of the matter is, it is a very simple process to spin up new VMs and migrate workloads in the cloud. If they choose to maintain the same level of control over their SQL Server environment, and prefer to manage their own servers, including patching, they can easily mimic their current environment in a set of virtual machines. They will benefit from broad security compliance, lending to the stringent security standards the Azure data centers maintain, and will have improved business continuity with SQL Server Always On Availability Groups on their VMs.
Simplify database infrastructure management
We wish to explore other ways to simplify our lives when it comes to our technology stack. In some ways, we like the full flexibility managing our own virtual servers provides. In other ways, we wish to spend less time managing our infrastructure, and devote that time to improving our application and core services. We're also concerned with not keeping up with server and SQL patches, which could leave us open to vulnerabilities or stability problems.
We would like to see options for making our SQL server totally cloud-based. We currently run SQL Server on-premises, which means that we are responsible for applying patches to the operating system, as well as SQL Server. In doing this, we experience downtime for applying patches, require our employees to work after-hours to patch or upgrade, and sometimes we're not very good at keeping up with these updates. Can we reduce some of this stress and have all of that managed in the cloud?
Proposed solution: Migrate SQL Server to Azure SQL Database
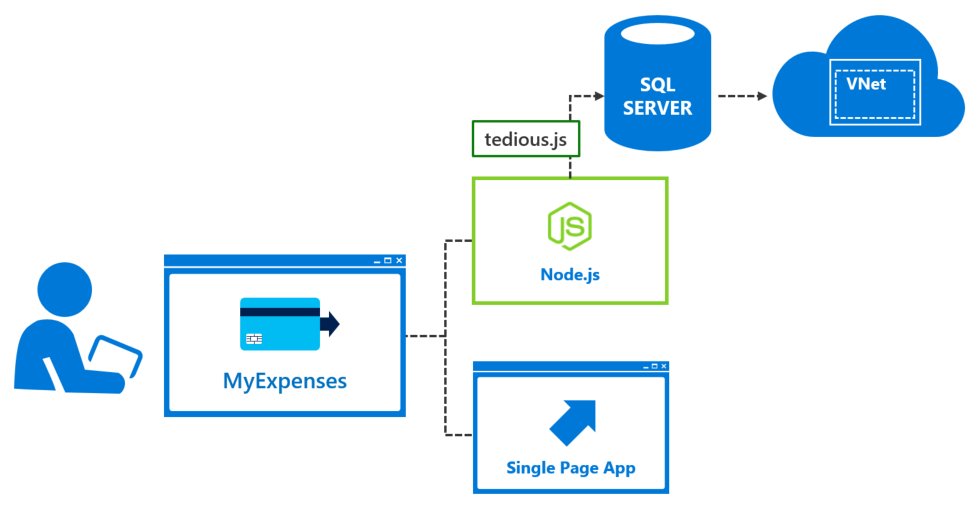
Since Azure SQL Database provides us with everything that SQL Server on-premises offers us, we're going to migrate the whole MyExpenses system to the cloud! Azure SQL Database delivers predictable performance, scalability with no downtime, business continuity and data protection — all with near-zero administration. As a bonus, it even automatically makes performance recommendations based on your app usage! This meets the team's desire to focus on rapid app development and accelerating their time to market, rather than managing virtual machines and infrastructure. Because it's based on the SQL Server engine, Azure SQL Database supports existing SQL Server tools, libraries and APIs, which makes it easier for you to move and extend to the cloud.
Additional benefits include the ability to migrate SQL Server databases with no app rebuilding; just the need to update connection strings. Also, using a virtual network (VNet) container will ensure isolation and security, ensuring only your application or authorized users on your network can gain access.
Follow this link to learn more about Azure SQL Database.
Since MyExpenses moved their database from on-premises to the cloud, they need to modify their database connection settings
in the
server.config.js file in their application.
Here's what the settings are currently:
 'use strict';

let config = {
    port: process.env.port || 8000,
    path: 'api',
    serverName>: 'DemoExpenses',
    db: {
        userName: process.env.databaseUsername || 'experience2',
        password: process.env.databasePassword || 'P2ssw0rd@Dev',
        database: process.env.database || 'Expenses',
        options: {
            host: process.env.databaseServer || 'localhost',
            dialect: 'mssql',
            pool: {
                max: 5,
                min: 0,
                idle: 10000
            }
        }
    }
};

module.exports = config;
All that needs to be done is to change this configuration file to point to the Azure SQL Database. No other application code needs to be changed!
 'use strict';

let config = {
    port: process.env.port || 8000,
    path: 'api',
    serverName: 'DemoExpenses',
    db: {
        userName: process.env.databaseUsername || '{YOUR_USERNAME}',
        password: process.env.databasePassword || '{YOUR_PASSWORD}',
        database: process.env.database || '{YOUR_AZURE_SQL_DATABASE_NAME}',
        options: {
            dialectOptions: {
                encrypt: true,
                requestTimeout: 3500000
            }
            host: process.env.databaseServer || '{YOUR_AZURE_SQL_SERVER}.database.windows.net',
            dialect: 'mssql',
            port: process.env.databasePort || 1433,
            pool: {
                max: 5,
                min: 0,
                idle: 10000
            }
        }
    }
};

module.exports = config;
Work through the hands-on example in the Developer Immersion lab.
Benefits of an intelligent database
Azure SQL Database includes built-in intelligence that helps you reduce the costs of running and managing databases, and maximizes both performance and security of your application. Azure SQL Database collects and processes a massive amount of telemetry data - while fully respecting customer privacy. Various algorithms are continuously evaluating the telemetry data so that the service can learn and adapt with your application. Based on this analysis, the service comes up with performance improving recommendations tailored to your specific workload
Automagically keep-up with ongoing security threats and increased performance needs
As systems grow, and more complexity and data are added, the need to continually improve performance and monitor the application for new vulnerabililties increases. As new application code is introduced, potential loop holes leave apps vulnerable to SQL injection, while increasing amounts of data can result in serious query performance issues, and a continued need to improve performance. However, managing and tuning the performance of relational databases is a challenging task that requires significant expertise and time investment.
Built-in intelligence for greater app performance and data security
To help combat these risks, MyExpenses has decided to use SQL Threat Detection, which detects anomalous activities indicating unusual and potentially harmful attempts to access or exploit databases. SQL Threat Detection provides a new layer of security, which enables customers to detect and respond to potential threats as they occur by providing security alerts on anomalous activities. Users will receive an alert upon suspicious database activities, potential vulnerabilities, and SQL injection attacks, as well as anomalous database access patterns. SQL Threat Detection alerts provide details of suspicious activity and recommend action on how to investigate and mitigate the threat. Users can explore the suspicious events using SQL Database Auditing to determine if they result from an attempt to access, breach, or exploit data in the database. Threat Detection makes it simple to address potential threats to the database without the need to be a security expert or manage advanced security monitoring systems. For more information, see SQL Database Threat Detection.
For example, SQL injection is one of the common Web application security issues on the Internet, used to attack data-driven applications, such as AdventureWorks Bikes. Attackers take advantage of application vulnerabilities to inject malicious SQL statements into application entry fields, breaching or modifying data in the database.
Query Performance Insight provides awareness of how queries impact performance
The team is also excited about a new feature of Azure SQL Database, which will help them continually tune and monitor their database and resource utilitzation. Query Performance Insight allows you to spend less time troubleshooting database performance by providing the following:
- Deeper insight into your databases resource (DTU) consumption.
- The top queries by CPU/Duration/Execution count, which can potentially be tuned for improved performance.
- The ability to drill down into the details of a query, view its text and history of resource utilization.
- Performance tuning annotations that show actions performed by SQL Azure Database Advisor
For more details, see Azure SQL Database Query Performance Insight
Index advisor recommends actions that improve performance
As part of the Query Performance Insights, Azure SQL Database provides recommendations for creating and dropping indexes, parameterizing queries, and fixing schema issues. The SQL Database Advisor assesses performance by analyzing your SQL database's usage history. The recommendations that are best suited for running your database´s typical workload are recommended.
- Create Index recommendations appear when the SQL Database service detects a missing index that if created, can benefit your databases workload (nonclustered indexes only).
- Drop Index recommendations appear when the SQL Database service detects duplicate indexes (currently in preview and applies to duplicate indexes only).
- Parameterize queries recommendations appear when the SQL Database service detects that you have one or more queries that are constantly being recompiled but end up with the same query execution plan. This opens up an opportunity to apply forced parameterization, which will allow query plans to be cached and reused in the future improving performance and reducing resource usage.

This service will allow the MyExpenses development team to monitor queries, and automatically manage indexes on their tables.
Opportunities to improve speed and resiliency
Let's turn our focus back to the application and how it uses the database features on our "MyExpenses" sceanrio. Ever since a successful campaign to sign on new companies to their services, MyExpenses has experienced an explosion in number users. Now, the development team wants to make sure they have the right architecture to maximize database performance, as well as resiliency required to recover from user errors.
Below is a list of their challenges, followed by proposed solutions. Some solutions contain interactive blocks of code you can use for some hands-on experience. Most offer links to labs for a more in-depth experience.
Recover from user errors saved to the database
It is important for us to be able to track the changes made to an expense by an employee, in order to see if some employees are messing up with the expenses amounts, and also to keep a historical record. Sadly, currently there is no way to do this, since each change overwrites the previous value.
Proposed solution: Recover from user errors more easily with versioned tables
A system-versioned temporal table is a new type of user table in SQL Server 2017 that keeps a full history of data changes automatically. It does this by adding special "period columns" that timestamp when the data is added or changed. What it also does is creates a special history table with a mirrored schema, so you have all previous versions of each row. All of this is done automatically, and you can even modify existing tables to use this feature. In the end, what you get is built-in support for providing information about data stored in the table at any point in time, rather than only the data that is correct at the current moment in time.
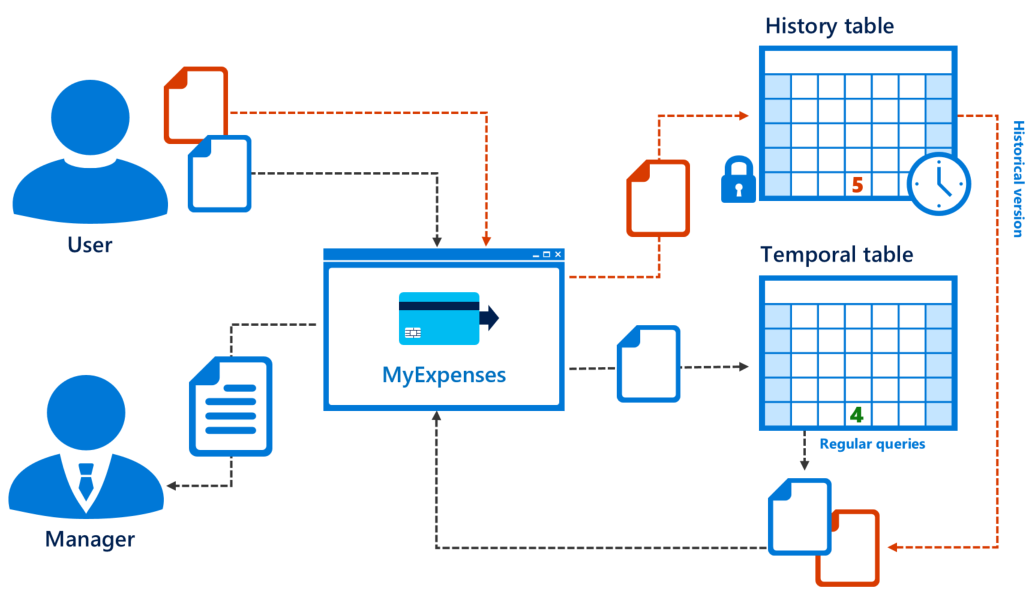
Here are some benefits you get with system-versioned tables:
- History tracking: it is integrated into SQL Server. You don’t have to configure anything (triggers, stored procedures, app…). The process below is automatic and optimal.
- Data analysis: The new clause, "FOR SYSTEM TIME", gives us the opportunity to travel into the history time of a table. This makes querying simple.
- Schema maintenance: Any change to your table schema, such as adding a column, will be applied to your history table as well.
- Data protection: Nobody can change temporal tables. Immutability of history is guaranteed so your history is protected from external access.
Check the following link for further information about the Temporal Tables feature.
CREATE TABLE [Expense].[Expense](
    [Id] [int] IDENTITY(1,1) NOT NULL,
    [Title] [nvarchar](50) NOT NULL,
    [Amount] [float] NOT NULL,
    [ExpenseReportId] [int] NOT NULL,
    [ExpenseCategoryId] [smallint] NOT NULL,
    [Date] [datetime2](7) NOT NULL,
    [SysStartTime] [datetime2] GENERATED ALWAYS AS ROW START NOT NULL,
    [SysEndTime] [datetime2] GENERATED ALWAYS AS ROW END NOT NULL,
    PERIOD FOR SYSTEM_TIME (SysStartTime,SysEndTime),
                            CONSTRAINT [PK_ExpenseTemporal.Expense] PRIMARY KEY CLUSTERED(
        [Id] ASC
    )WITH (PAD_INDEX = OFF, STATISTICS_NORECOMPUTE = OFF, IGNORE_DUP_KEY = OFF, ALLOW_ROW_LOCKS = ON, ALLOW_PAGE_LOCKS = ON) ON [PRIMARY]
)WITH(SYSTEM_VERSIONING = ON (HISTORY_TABLE = Expense.ExpenseHistory))
# Query to get history
SELECT *
FROM Expense.ExpenseHistory

# Query to get current value
SELECT *
FROM Expense.Expense
WHERE Id=1

# Query to get all changes for specific expense
SELECT *
FROM Expense.Expense FOR SYSTEM_TIME ALL
WHERE Id=1
First, create a new table using Temporal Tables. Note the GENERATED SysStartTime and SysEndTime columns, the PERIOD FOR SYSTEM_TIME (SysStartTime,SysEndTime), and HISTORY_TABLE parts of the CREATE TABLE query. These tell SQL Server you want to create a temporal table and what you want to name the columns that track the time periods a record was the current record, and what you want to name the table that will contain the historical values of the record.
Next, insert a new row into the Expense table:
Next, take a look at the inserted row to see the date/time values inserted into the temporal columns SysStartTime and SysEndTime:
Expense Table:
| ID | Title | Amount | Date | ExpenseReportId | ExpenseCategoryId | SysStartTime | SysEndTime |
|---|---|---|---|---|---|---|---|
Now take a look at what is currently in the ExpenseHistory temporal table:
ExpenseHistory Table:
| ID | Title | Amount | Date | ExpenseReportId | ExpenseCategoryId | SysStartTime | SysEndTime |
|---|---|---|---|---|---|---|---|
Note that there are no rows in the history table because there is only a single version of the row at this point, the one that you inserted, which is the current row.
Now take a look at what versions of the row exist with a FOR SYSTEM_TIME query:
Expense Table with FOR SYSTEM_TIME ALL:
| ID | Title | Amount | Date | ExpenseReportId | ExpenseCategoryId | SysStartTime | SysEndTime |
|---|---|---|---|---|---|---|---|
Note this query too only shows a single version of the row.
Now apply an update to the row:
Now execute the three SELECT queries again to see how the results have changed:
Expense Table:
| ID | Title | Amount | Date | ExpenseReportId | ExpenseCategoryId | SysStartTime | SysEndTime |
|---|---|---|---|---|---|---|---|
ExpenseHistory Table:
| ID | Title | Amount | Date | ExpenseReportId | ExpenseCategoryId | SysStartTime | SysEndTime |
|---|---|---|---|---|---|---|---|
Expense Table with FOR SYSTEM_TIME ALL:
| ID | Title | Amount | Date | ExpenseReportId | ExpenseCategoryId | SysStartTime | SysEndTime |
|---|---|---|---|---|---|---|---|
Here you can see that the updated row is the current row, the previous row version is in the history table with the amount before the update, and both versions of the row show in the FOR SYSTEM_TIME ALL query with their respect times that each was active in the SysStartTime and SysEndTime columns.
Work around slow disks and bottlenecks
There are thousands of users of MyExpenses all over the world, and for most of them performance is a really important feature: sometimes a deal-breaker. In our web application, for security reasons, every request and response is logged into an audit table.
Using this audit table "as is" is leading us into a big performance problem. Since this is a table where each and every request and response is stored, there are lots of concurrent operations generated by the web application. The more the web application is used, the more traffic hits this table. This is a performance problem, because it can impact the entire database due to IO operations, and leads to degraded performance across the whole site.
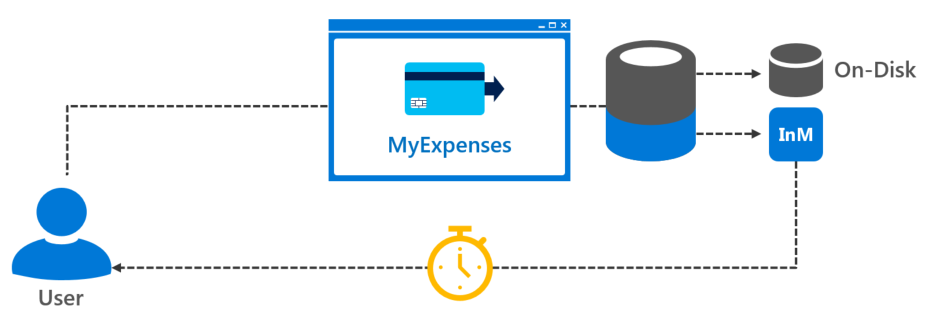
Proposed solution: Accelerated transactional processing with in-memory tables
There are a few ways to address this problem from an application development perspective. The possibilities range from simple, such as unblocking database calls by using asynchronous functions, to complex rewrites involving decoupling your application components as much as possible using stateless microservices and relying on eventual concurrency of your data. This last example is something that Service Fabric can help you create.
However, oftentimes it is possible to make drastic improvements in performance by using new database features, avoiding any changes to the application itself. In this case, we can improve throughput to the affected tables by using SQL Server 2017 In-Memory OLTP (online transaction processing) feature for in-memory tables. It improves throughput and reduces latency for transaction processing, and can help improve performance of transient data scenarios such as temp tables and ETL. In-Memory OLTP is a memory-optimized database engine integrated into the SQL Server engine, optimized for transaction processing. Some of the features are:
- Eliminate contention and logging in high data insertion scenarios
- Require low latency business transactions which typical database solutions cannot achieve
- Efficient data retrieval
Check the following link for further info about the In-Memory OLTP feature.
Before we can create an in-memory table, we need to configure SQL Server with a FileGroup prepared with the In-Memory feature.
ALTER DATABASE [Expenses]
                            ADD FILEGROUP MEMORYOPTIMIZATIONFG
    CONTAINS MEMORY_OPTIMIZED_DATA;

    GO

                            ALTER DATABASE [Expenses]
                            ADD FILE
    (
        NAME = N'FileMemOptima1',
        FILENAME = N'c:\FileMemOptimization1'
    )
                            TO FILEGROUP MEMORYOPTIMIZATIONFG;
Here is the code to create a table using the In-Memory OLTP feature:
CREATE TABLE [Audit].[WebAudit](
    [Id] [int] IDENTITY(1,1) PRIMARY KEY NONCLUSTERED NOT NULL,
    [Email] [nvarchar](60) NOT NULL,
    [Path] [nvarchar](255) NULL,
    [RequestContent] [nvarchar](max) NULL,
    [Verb] [varchar](10) NULL,
    [ResponseCode] [nvarchar](3) NULL,
    [ResponseContent] [nvarchar](max) NULL,
    [Date] [datetime2](7) NOT NULL
) WITH (MEMORY_OPTIMIZED=ON);

GO
To see the execution impacts of in-memory tables, you can execute a batch of inserts into the WebAudit table as a normal on-disk table (not in-memory), and as an in-memory table. Select a number of inserts to perform and click GO.
In-memory
    Execution time:  ms
    I/O Cost:
On-disk
    Execution time:  ms
    I/O Cost:
Speed-up data analysis
For the same reasons we are concerned about peak performance, as explained before, we want to improve the performance of two important MyExpenses areas: expenses and purchase orders. Improving these areas will make sure that both the reports that are shown to the team managers, and the standard expense reporting in the website, will feel as responsive as possible.
We have created indexes that cover the types of queries our canned and ad-hoc reports generate, but those didn't seem to help.
Proposed solution: Improve data compression and query speed
When you are using fact tables and large dimension tables in a data warehouse, you should think about both data compression and performance improvements that can be gained through a different approach to indexing. This also holds true for slowdowns that happen due to a lot of transactions on a table where you are also trying to perform analysis in real-time. First introduced in SQL Server 2016, and also available in Azure SQL Database, clustered columnstore indexes for in-memory tables can help in both of these scenarios.
In this particular customer scenario, the columnstore indexes will help MyExpenses analyze a huge amount of data information contained in their data warehouse system with very large performance improvements. While new expenses are introduced on the website every minute, performance of the reports begins to suffer. Adding columnstore indexes will improve performance and reduce response time of the reports backed by the MyExpenses data warehouse.
NOTE: The other area we mentioned where columnstore indexes can be very useful is for real-time operational analytics. In other words, running both analytics and OLTP workloads on the same tables at the same time. Rather than dealing with the complexity of ETL (Extract, Transform, and Load) jobs that move data into a data warehouse (which is an additional cost), and also dealing with the data latency waiting for those jobs to execute, you can now take advantage of real-time operational analytics. Please note that this does not replace the need for a separate data warehouse when you need to integrate data from multiple sources before running the analytics workload or when you require extreme analytics performance using pre-aggregated data such as cubes.
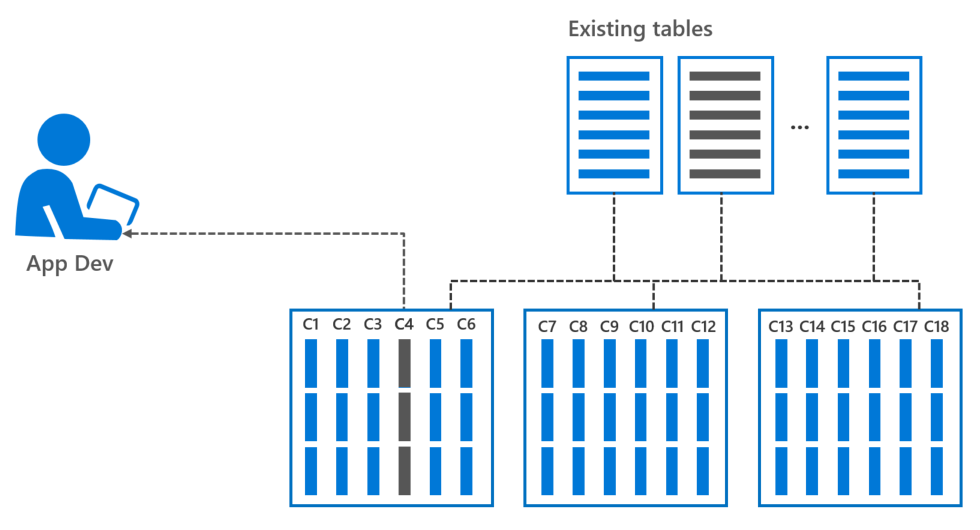
A columnstore index is a technology for storing, retrieving, and managing data by using a columnar data format, called a columnstore, over traditional row-oriented storage. So a columnstore stores data that is logically organized as a table with rows and columns, and physically stored in a columnar format. This gives us two significant benefits:
- 10x Query improvements in data warehouses over row-oriented storage
- 10x Data compression over the uncompressed data size (data from the same domain compresses better)
Check the following link for further information about In-Memory columnstore indexs.
Create a new in-memory table with a clustered columnstore index (
ExpenseCCI):
CREATE TABLE [dwh].[FactExpense] (
    [IdExpense] [int] NOT NULL PRIMARY KEY NONCLUSTERED,
    [IdCalendar] [int] NOT NULL,
    [IdExpenseCategory] [smallint] NOT NULL,
    [IdCostCenter] [smallint] NOT NULL,
    [IdEmployee] [int] NOT NULL,
    [IdReport] [int] NOT NULL,
    [Amount] [decimal](10, 2) NOT NULL,
                            INDEX ExpenseCCI CLUSTERED COLUMNSTORE
)WITH (MEMORY_OPTIMIZED = ON);
First, create the table with in-memory columnstore options:
Now execute the following queries, which will turn on statistics and then will get all rows from the FactExpense table.
With in-memory columnstore
Without in-memory columnstore
Scale the db on demand
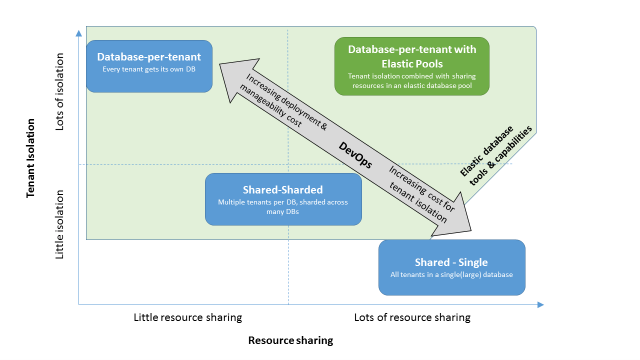
One of the major challenges associated with multi-tenant applications is the management of diverse tenant stores (databases) with varied demand. MyExpenses has decided to go to a database-per-tenant model. This model provides good tenant isolation, but also results in limited resource sharing. With businesses of different sizes scattered around the world, MyExpenses has experienced problems with properly scaling their databases, given the varying and unpredictable usage patterns seen between businesses. Traditionally, there are two options for dealing with this problem: (1) over-provision resources based on peak usage and over pay to meet demands, or (2) under-provision to save cost, at the expense of performance and tenant satisfaction during peaks.
Dealing with varied and unpredictable spikes in demand
Knowing their application must to be able to handle the database resource requirements for tenants of varying sizes and usage levels, as well as accommodate peak usage periods across multiple time zones, the MyExpenses team is looking for a solution which will allow their current design to be flexible enough to handle the varying and less predictable workloads that they have seen from their tenant stores, while allowing them to avoid the traditional trade-offs of higher costs and lower tenant satisfaction.
Proposed solution: Elastic Database Pools enable cost-effective and predictable pooling of resources
To solve this problem, they have decided to implement Azure SQL Database Elastic Pools. Elastic Pools ensure that databases get the performance resources they need when they need it, providing a simple, cost effective solution to manage the performance goals for multiple databases that have widely varying and unpredicatable usage patterns. By grouping their stores into Elastic Pools, based on regions, and store sizes, the team believes they will be able to effectively manage their database resources, and do it within a set budget. To learn more about how Elastic pools can help you manage and scale mulitiple Azure SQL databases, click here.
As the number of businesses using the MyExpenses service has grown rapidly, and considering the expectation that more businesses
are constantly being added into the application, the development team has added a new
ElasticPoolManager class to automate creating new tenant databases, and adding them directly into an Elastic Pool based
on the store's region. After ensuring that their Active Dirctory App registration has been granted permissions
to the Windows Azure Service Management API through the Azure portal, they installed the necessary packages
from the NuGet Package Manager console:
Install-Package Microsoft.Azure.Management.Sql -Preusing Microsoft.Azure.Management.Resources;
using Microsoft.Azure.Management.Sql;
using Microsoft.Azure.Management.Sql.Models;
using Microsoft.IdentityModel.Clients.ActiveDirectory;
using Microsoft.Rest;
public class ElasticPoolManager
{
public void CreateDatabaseInElasticPool(int companyNumber, string region)
{
var databaseName = $"Expense.Company{storeNumber}";
var serverName = "expenseservice";
var subscriptionId = "00000000-0000-0000-0000-000000000000"; /* Azure Subscription ID */
string resourceGroup = "myexpenses"; /* Name of Resource Group containing SQL Server */
var token = GetTokenCloudCredentials();
var client = new SqlManagementClient(token) { SubscriptionId = subscriptionId };
var database = new Database
{
Location = region,
Edition = "Basic",
RequestedServiceObjectiveName = "ElasticPool",
ElasticPoolName = $"CompanyDatabasePool{region.Replace(" ", "")}",
MaxSizeBytes = "2147483648", // 2 GB,
Collation = "SQL_Latin1_General_CP1_CI_AS"
};
var response = client.Databases.CreateOrUpdate(resourceGroup, serverName, databaseName, database);
}
public TokenCredentials GetTokenCloudCredentials()
{
var resource = "https://management.core.windows.net/";
var loginEndpoint = "https://login.windows.net/";
var tenantId = "myexpenses.onmicrosoft.com"; /* Azure Tenant ID or AAD domain */
var authString = loginEndpoint + tenantId;
/* AAD App Registration Info */
var clientId = "00000000-0000-0000-0000-000000000000"; /* Active Directory Client ID */
var appKey = "AIjdQOQtDoRWJ3QnV5yumZJZrzUCn00P4u7abMqdlf0="; /* Active Directory Client Key */
var clientCred = new ClientCredential(clientId, appKey);
var authenticationContext = new AuthenticationContext(authString, false);
var authenticationResult = authenticationContext.AcquireToken(resource, clientCred);
return new TokenCredentials(authenticationResult.AccessToken);
}
}
With this code now included in the application, any new tenant stores that are added will have their database created and added to the Elastic Pool established for their region, and it's all done automatically through the application's tenant provisioning page. Not only will this help to decrease the teams DevOps workload, but the automated process will also help to eliminate mistakes of stores being added to the wrong pool, as they want to avoid data egress charges where possible.
Manage multiple databases at once
In addition to scalability issues, the database-per-tenant model employed by MyEpenses has also resulted in increasingly complex DevOps around maintaining all of the databases for each tenant business store. The develoment team surfaced concerns about the increased workload that will come with supporting even more databases, given their already heavy DevOps workload. They would like to streamline the process of making database changes. Provisioning resources for the entire pool rather than for single databases would simplify management tasks, and provide a more predictable budget for the pool.
Proposed solution: Elastic Database Jobs streamline admin tasks
With an Elastic Pool, management tasks can be greatly simplified through the use of Elastic Jobs. Elastic jobs eliminate most of the tedium associated with maintaining large numbers of databases, enabling you to easily and reliably manage large groups of Azure SQL Databases by running Transact-SQL scripts to perform administrative operations. This has the added benefit of allowing development teams to leverage their existing T-SQL skills. For an overview of Elastic jobs, see Managing scaled-out cloud databases.

Scripts written for use with Elastic Jobs must be idempotent. In simple terms, "idempotent" means that if the script succeeds, and it is run again, the same result occurs. A script may fail due to transient network issues. In that case, the job will automatically retry running the script a preset number of times before desisting. A simiple tactic is to use an "IF EXISTS" statement to check for the existence of an object before creating it, and delete any found instance before creating a new object.
One of the changes the development team has recently been asked to make is to add an
ApprovalCode column to the
Expense table to correlate submitted expenses with a new external expense management system that generates a
special approval code. Making sure to create an idempotent script, the development team published the
following script as an Elastic job. The
IF NOT EXISTS clause ensures the script can be run again, and that the column will only be added if it does not already
exist.
IF NOT EXISTS(SELECT * FROM sys.columns WHERE object_id = OBJECT_ID(N'[Expense].[Expense]') AND name = 'ApprovalCode')
BEGIN
                            ALTER TABLE [Expense].[Expense] ADD ApprovalCode NVARCHAR(26) NULL
END
GO
With Elastic Pools and jobs now in place, the developoment team has been able to reduce their DevOps workload, replacing a very tedious processes, such as updating hundreds of databases individually, with automated code and simple T-SQL scripts. When executed, an Elastic job will update each database in the pool, and greatly simplify the teams administrative workload. To get started, see Create and manage scaled out Azure SQL Databases using Elastic Jobs.
Now that we have greatly simplified our database management, and have an easy way to push database updates and schema changes to all of our databases, let's move on to addressing some of the other issues with the AdventureWorks application.
Protect your data and your brand
While interviewing the MyExpenses leadership, as well as developers, a common set of concerns around security of user data and the database itself, was revealed.
The app contains massive amounts of sensitive communication to secure.
As developers, we tend to think about security last. The upfront pressure drives us to create a working product as quickly as possible, and we tend to focus more on the technology used, the application architecture, how domain knowledge is expressed in code and to the user, and even ways to validate the data input from the user. Other pressures, such as tight deadlines and the rythm of business, also compound the problem.
The MyExpenses development team has put some security measures in place, but they would like to improve on what they've done. Here are some of their challenges:
Back-end filters to control access to data
Right now, the MyExpenses website controls user access to the data via JavaScript filters. Think for a moment what would happen if developers accidentally forget or delete the lines of code in charge of filtering reports. Every employee of the company would see data they are not supposed to, and this could be a big problem!
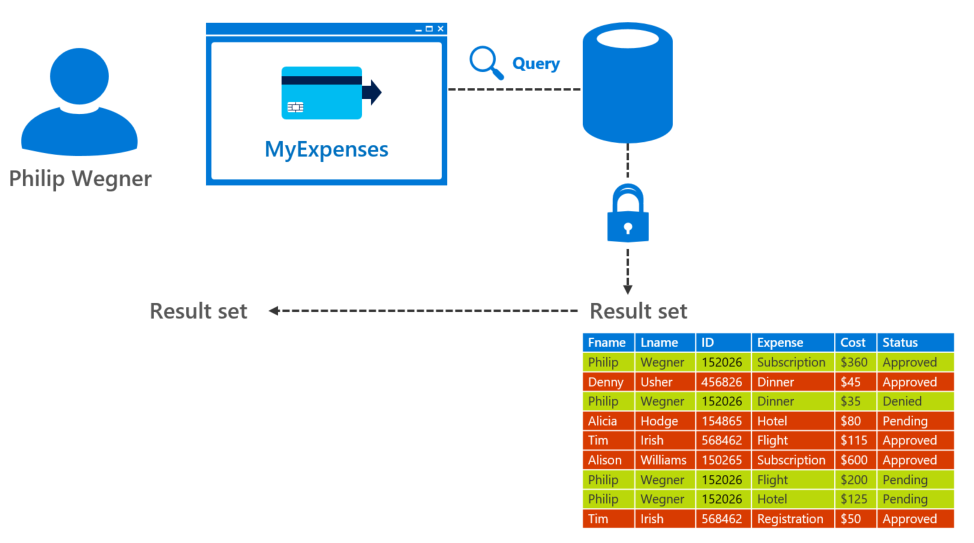
Proposed solution: Controlled access to data rows
These filters can be put in place where the data lives. This helps ensure that the data is filtered no matter what. In order to be safer, we are going to apply Row-Level Security (RLS) to our Expenses database, so that when users access their expenses, they just see their ones and not those from other users. Applying this change, we free the app developers of security concerns like this.
Row-Level Security is a feature that first appeared in SQL Server 2016 (also available in Azure SQL Database) that enables customers to control access to rows in a database table based on the characteristics of the user executing a query.
Check the following link for further information about the Row Level Security feature.
The code below applies Row-Level Security on the
ExpenseReport table. The
fn_expensesReportsPredicate function will be evaluated any time a user executes queries against the table. For each row in the table,
the Employee Id of the current evaluated row will be passed to the function.
CREATE FUNCTION [Expense].fn_expensesReportsPredicate(@EmployeeId int)
RETURNS TABLE
WITH SCHEMABINDING
AS
RETURN
SELECT 1 AS fn_accessResult
FROM [Expense].[PermissionMap]
WHERE CONTEXT_INFO() = [Email]
                            AND ([Id] = @EmployeeId
                            OR
        ([IsTeamManager] = 1 AND
            [TeamId] = (SELECT TeamId
                            FROM [Expense].[PermissionMap]
                            WHERE [Id] = @EmployeeId)
            )
        )
GO

CREATE SECURITY POLICY ExpensesReportPolicy
ADD FILTER PREDICATE [Expense].fn_expensesReportsPredicate(EmployeeId) ON [Expense].[ExpenseReport]
GO
There is one issue remaining. All of the users in the application are using the same login against the database. This is
standard practice. To solve this, every time a new connection is opened to the database, a session variable
called
CONTEXT_INFO is set with the user's email. When you look in the function we created above, you'll see this variable
checked against the
Email field of the permissions table. Here is the procedure we will create to set the
CONTEXT_INFO variable:
CREATE PROCEDURE [Expense].[SetContextInfo]
    @Email NVARCHAR(60)
AS
BEGIN
                            DECLARE @encodedEmail VARBINARY(128)
                            SET @encodedEmail = convert(VARBINARY(128), @Email)
                            SET CONTEXT_INFO @encodedEmail
END
GO
Now we alter the Node.js client web application to prefix queries against the RLS-protected table with a call to the
SetContextInfo procedure with the user's email address so they can see their data. Otherwise, nothing will be returned!
return sequelize.transaction(function (t) {
                            return sequelize.query('EXEC [Expense].[SetContextInfo] @Email=N\'' + ownerEmail + '\'', { transaction: t }).then(function () {
                            return countReports(ownerEmail, status, filter, t).then(function (c) {
                            conditions.transaction = t;
                            return ExpenseReport.findAll(conditions).then((reports) => {
                            return buildReportList(reports, pageIndex, pageSize, c);
            });
        });
    });
});
| ID | Name | Team | Purpose | Amount | Status |
|---|---|---|---|---|---|
|
|
Hide sensitive information from untrusted eyes
Since we’re working with sensitive information (emails, account numbers...), we need to ensure only authorized users can access it. At the moment, any employee with access to the database can look at any other employee email address, or worse... account number. Worse yet, if a malicious attacker manages to access the database, we would be in a lot of trouble.
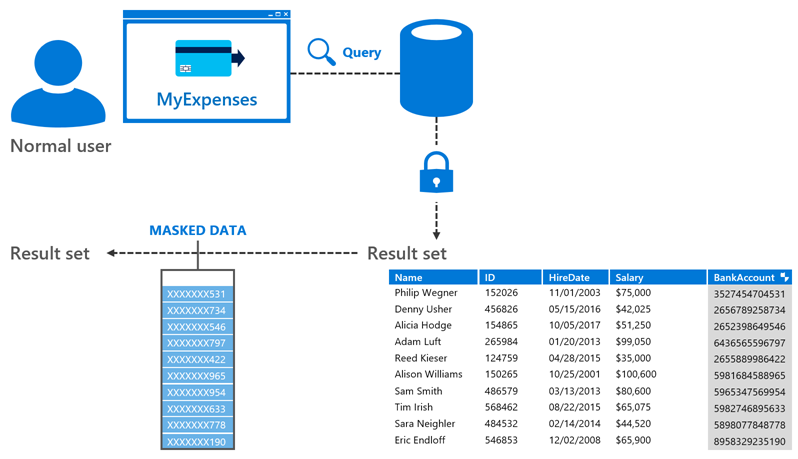
Proposed solution: Sensitive information concealed with Dynamic Data Masking
We've considered different approaches to solve the issue, and decided to try one of the new features of SQL Server 2016: Dynamic Data Masking (DDM). Based on what we've investigated, it should allow masking of the sensitive fields so they're not out in the open.
DDM can be defined on a per-column basis, indicating the level of obfuscation that will be applied to each one of them:
- Default masking, which fully masks the original value
- Partial masking, which allows a custom masking to be applied (such as only showing last 4 of a social security number)
- Random masking, which replaces a numeric value with a random one within a specified range
- Email masking, which exposes only the first character of the email and keeps its format
Check this link for further information about the Dynamic Data Masking feature.
In MyExpenses, we have a few fields that contain sensitive information: the employee email address and their account number. Right now, any IT employee that connects to the MyExpenses database can access this information, and we want to ensure this is not the case anymore. Applying DDM will allow us to hide emails and account numbers from non-privileged users, while keeping them available for users with the proper permissions. Let’s see which steps we need to follow in order to get it done.
Execute the following SQL statement to enable data masking on an email column:
ALTER TABLE [Expense].[Employee]
ALTER COLUMN Email ADD MASKED WITH (FUNCTION = 'email()');
The next SQL statement sets DDM on a bank account number column with a partial filter that will only show the last two digits of the account number:
ALTER TABLE [Expense].[Employee]
ALTER COLUMN BankAccountNumber ADD MASKED WITH (FUNCTION = 'partial(0,"XXXXXXXXXXXXXXX",2)');
| ID | Name | Salary | BankAccountNumber | HireDate | |
|---|---|---|---|---|---|
Encryption protects data from a security breach
Our database contains personally identifiable information (PII) about our employees, such as social security numbers. Right now, this information is stored as plain text. The PII data is required by the human resources (HR) application for things like managing payroll and benefits for employees.
However, it's a massive risk to have such sensitive information easily accessible. We need to make sure that this information is kept secure, not only because of security audits, but because of the risk to our employees if the information is accessed by a malicious attacker. We know we can obfuscate the information using DDM, but we feel better knowing that the data is encrypted at rest in the file system, and is not vulnerable to someone running exhaustive ad-hoc queries. We also need to know the data is protected in the event of a security breach where a malicious attacker has access to the files.
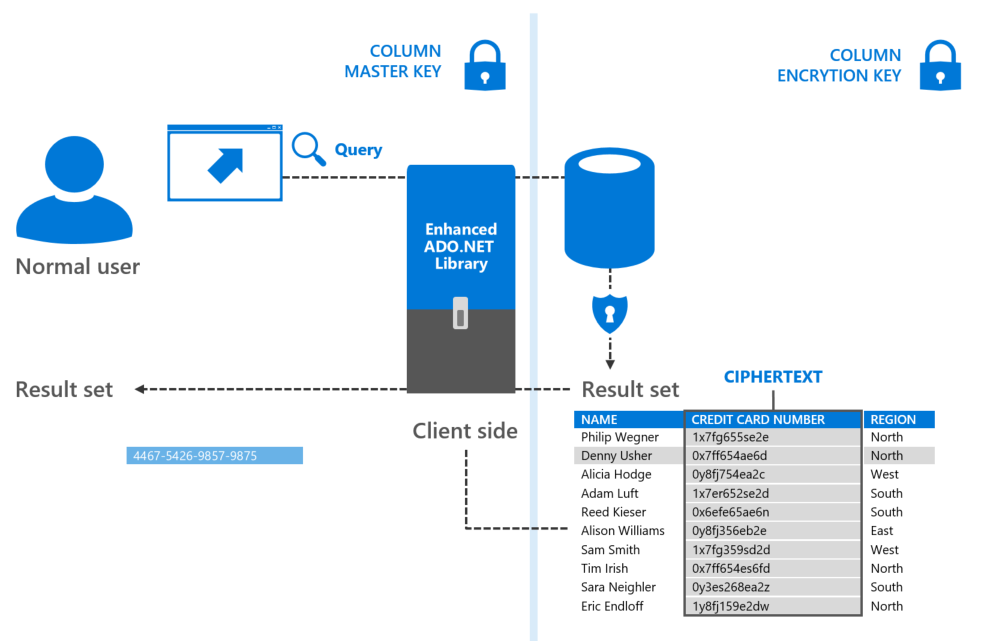
Proposed solution: Client-side encryption ensures encrypted data is unknown to the database
A client-side encryption solution would ensure that neither the encrypted data, nor the encryption keys, are revealed to the database. It is the sole responsibility of the client driver to encrypt the data before sending it to the database engine, and decrypt the data retrieved from the database. This provides a clear separation between the data owners, who can view it freely, and the data managers, who shouldn't be able to access it.
So we decided to try SQL Server's Always Encrypted feature. With Always Encrypted we can encrypt the PII information and be completely safe since only the HR application, using the proper key, will be able to decrypt it. Since the encryption and decryption of the data is managed by the driver, Always Enabled makes encryption transparent to the client applications.
Check this link for further information about the Always Encrypted feature.
By using Always Encrypted to encrypt the employee's sensitive information in the MyExpenses HR application, we aim to improve the security of the app by ensuring they cannot be read by anyone besides the client. Let’s see which steps we need to follow in order to get it done.
The first step in configuring Always Encrytped is creating column master key metadata and column encryption key metadata. This is accomplished by executing the following T-SQL script in SSMS.
CREATE COLUMN MASTER KEY MyCMK
WITH (
    KEY_STORE_PROVIDER_NAME = 'MSSQL_CERTIFICATE_STORE',
    KEY_PATH = 'Current User/Personal/f2260f28d909d21c642a3d8e0b45a830e79a1420'
);

CREATE COLUMN ENCRYPTION KEY MyCEK
WITH VALUES
(
    COLUMN_MASTER_KEY = MyCMK,
    ALGORITHM = 'RSA_OAEP',
    ENCRYPTED_VALUE = 0x01700000016C006F00630061006C006D0061006300680069006E0065002F006D0079002F003200660061006600640038003100320031003400340034006500620031006100320065003000360039003300340038006100350064003400300032003300380065006600620063006300610031006300284FC4316518CF3328A6D9304F65DD2CE387B79D95D077B4156E9ED8683FC0E09FA848275C685373228762B02DF2522AFF6D661782607B4A2275F2F922A5324B392C9D498E4ECFC61B79F0553EE8FB2E5A8635C4DBC0224D5A7F1B136C182DCDE32A00451F1A7AC6B4492067FD0FAC7D3D6F4AB7FC0E86614455DBB2AB37013E0A5B8B5089B180CA36D8B06CDB15E95A7D06E25AACB645D42C85B0B7EA2962BD3080B9A7CDB805C6279FE7DD6941E7EA4C2139E0D4101D8D7891076E70D433A214E82D9030CF1F40C503103075DEEB3D64537D15D244F503C2750CF940B71967F51095BFA51A85D2F764C78704CAB6F015EA87753355367C5C9F66E465C0C66BADEDFDF76FB7E5C21A0D89A2FCCA8595471F8918B1387E055FA0B816E74201CD5C50129D29C015895CD073925B6EA87CAF4A4FAF018C06A3856F5DFB724F42807543F777D82B809232B465D983E6F19DFB572BEA7B61C50154605452A891190FB5A0C4E464862CF5EFAD5E7D91F7D65AA1A78F688E69A1EB098AB42E95C674E234173CD7E0925541AD5AE7CED9A3D12FDFE6EB8EA4F8AAD2629D4F5A18BA3DDCC9CF7F352A892D4BEBDC4A1303F9C683DACD51A237E34B045EBE579A381E26B40DCFBF49EFFA6F65D17F37C6DBA54AA99A65D5573D4EB5BA038E024910A4D36B79A1D4E3C70349DADFF08FD8B4DEE77FDB57F01CB276ED5E676F1EC973154F86
);
The next step is to add encryption to the AccountNumber column in the Employee table, using the previously created encryption key, in PowerShell.
Install-module -Name SqlServer -Scope CurrentUser

Import-Module SqlServer

# Load reflected the required SQL assemblies
[reflection.assembly]::LoadwithPartialName('System.Data.SqlClient') | Out-Null
[reflection.assembly]::LoadwithPartialName('Microsoft.SQLServer.SMO') | Out-Null
[reflection.assembly]::LoadwithPartialName('Microsoft.SQLServer.ConnectionInfo') | Out-Null

# Set up a connection to the Expenses database
$sqlConnectionString = 'Data Source={YOUR_DATABASE_SERVER};User ID=experience1;Password=P2ssw0rd@Dev;MultipleActiveResultSets=False;Encrypt=False;TrustServerCertificate=True;Packet Size=4096;Application Name="Microsoft SQL Server Management Studio"'
$sqlConnection = New-Object 'System.Data.SqlClient.SqlConnection' $sqlConnectionString
$serverConnection = New-Object 'Microsoft.SqlServer.Management.Common.ServerConnection' $sqlConnection
$smoServer = New-Object 'Microsoft.SqlServer.Management.Smo.Server' $serverConnection
$smoDatabase = $smoServer.Databases['Expenses']

# Set up encryption for the BankAccountNumber column
$encryptionChanges = @()
$encryptionChanges += New-SqlColumnEncryptionSettings -ColumnName Expense.Employee.BankAccountNumber -EncryptionType Deterministic -EncryptionKey alwaysEncryptedColumnEncryptionKey

# Execute the PowerShell command
Set-SqlColumnEncryption -ColumnEncryptionSettings $encryptionChanges -InputObject $smoDatabase
Now, when you go back to SSMS and execute the following statement, the results will be encrypted:
SELECT BankAccountNumber FROM [Expense].[Employee];
It will be the responsibility of your client application's database driver to support Always Encrypted. When using the standard
ADO.NET APIs, this Always Encrypted support can be enabled by setting the
Column Encryption Setting connection string keyword to
enabled:
string connectionString = "Data Source=adventureworks;Initial Catalog=adventures.bikes.Store1;Integrated Security=true;Column Encryption Setting=enabled";Try out the Always Encrypted feature in the Developer Immersion lab.
Manage identity across multiple log-in systems
Another issue the MyExpenses team is looking to address is the management of user accounts. Historically, the team has created individual user accounts for each application throughout the organization, and users have had to remember passwords for each. This process has been time-consuming and difficult to organize, and only allows for limited integration with diverse platforms and devices. To solve this problem, they are going to implement Azure Active Dirctory.
Proposed solution: Streamlined access management with Azure Active Directory
Azure Active Directory (AAD) provides a simple and efficient means of managing user accounts through single sign-on. Single sign-on means being able to access all of the applications and resources that you need to do business, by signing in only once using a single user account. Once signed in, you can access all of the applications you need without being required to authenticate (e.g. type a password) a second time. Azure AD enables easy integration to many of today’s popular SaaS applications; it provides identity and access management, and enables users to single sign-on to applications directly, or discover and launch them from a portal such as Office 365 or the Azure AD access panel. AAD also provides self-service for users, and is compatible with multiple platforms and devices. For more information on using Azure AD, see Authenticate user Azure AD and OpenID Connect

Manage emerging application requirements
Since MyExpenses has been deployed, there have been several emerging requirements to add new features and address issues. This is typical while maintaining custom-built applications, but the development team has brought up a few pain points that make it difficult to keep up with demand.
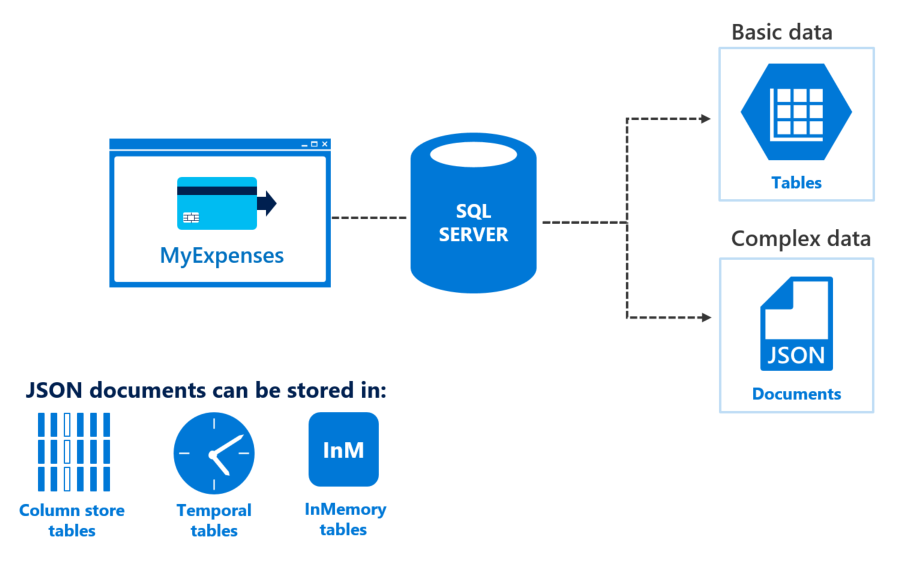
Handle unstructured data
One of the features offered by MyExpenses is getting an expense reinbursed in company points, which can be spent directly in the website. We want to provide additional information about the existent products in our catalog, in particular the games currently available in the catalog. When doing something like this, it is common to use a service that provides APIs to get all the available information about a videogame, and you usually obtain this information in JSON format. But it would be a heavy task having to parse all the possible information to new columns in the table. Besides, it wouldn't be a good idea because our catalog comprises not only videogames, but hardware and other software products, so these new columns wouldn't make any sense and we should create a new table just for the videogame catalog. Is there a simple way to just work directly with the JSON data?
Proposed solution: Improve app productivity with JSON support
JSON is currently one of the most commonly used data exchange formats. JSON is also used for storing unstructured data in log files or NoSQL databases like Microsoft Azure Cosmos DB. Many REST web services return results formatted as JSON text or accept data formatted as JSON, and most Azure services such as Azure Search, Azure Storage, and Azure Cosmos DB have REST endpoints that return or consume JSON. JSON is also the main format for exchanging data between web pages and web servers using AJAX calls. Because a lot of data is formatted as JSON, it is important to enable SQL Server to process JSON text retrieved from other systems or to format information retrieved from SQL Server tables as JSON text.
Another benefit to adding JSON data to your database tables is being able to represent hierarchies. Whether you are writing your client application in .NET, node.js, or any other modern framework, you will be able to serialize the hierarchical JSON data into objects. This makes it very easy to work with JSON data in either direction. You will see this in action in our game data sample below.
Check the following link for further information about JSON capabilities on SQL SERVER 2016.
Execute the SQL statement below to add a new column to store JSON data. Notice that there is no new data type required. Using
NVARCHAR(MAX) maintains compatibility with existing code and database drivers. The
ISJSON check makes sure that the passed in value is in correct JSON format.
ALTER TABLE [Catalog].[Product]
ADD AdditionalInformation NVARCHAR(max) NULL
CONSTRAINT AdditionalInformationMustBeJson
CHECK (ISJSON(AdditionalInformation) > 0)
GO
Now let's update the Forza Horizon 3: Hot Wheels row in this table with additional game information, using the new column to store the JSON data:
UPDATE [Catalog].[Product]
SET [AdditionalInformation] = N'
{
    "Data": {
        "baseImgUrl": "http://thegamesdb.net/banners/",
        "Game": {
            "id": "45998",
            "GameTitle": "Forza Horizon 3: Hot Wheels",
            "PlatformId": "4920",
            "Platform": "Microsoft Xbox One",
            "ReleaseDate": "05/09/2017",
            "Overview": "Forza Horizon 3 Hot Wheels takes players to six new themed islands located off the coast of Australia; all connected by a network of Hot Wheels tracks – positioned hundreds of feet in the air – featuring classic Hot Wheels configurations like loops, corkscrews, and more. This is stunt driving at its most extreme, where you can master tracks by performing brand new Hot Wheels skills that make use of boost pads, high-bank turns, half-pipes, insane jumps, and even giant mechanical dinosaurs. If you’re looking to get creative, check out the new Stunt Swap feature to modify stunt track sections and dare your friends to try them.",
            "ESRB": "E - Everyone",
            "Genres": {
                "genre": "Racing"
            },
            "Players": "4+",
            "Co-op": "Yes",
            "Youtube": "http://www.youtube.com/watch?v=6-K_M4i2Bbs",
            "Publisher": "Microsoft Studios",
            "Developer": "Turn 10 Studios",
            "Rating": "9",
            "Images": {
                "boxart": {
                    "-side": "front",
                    "-width": "1034",
                    "-height": "1344",
                    "-thumb": "boxart/thumb/original/front/45998-1.jpg",
                    "#text": "boxart/original/front/45998-1.jpg"
                }
            }
        }
    }
}
'
WHERE [Title] = 'Forza Horizon 3: Hot Wheels'
GO
We can query this information while formatting the results as JSON, using the built-in
FOR JSON function:
SELECT [Id]
    ,[Title]
    ,[Price]
    ,[CreationDate]
    ,[Available]
    ,[ProductCategoryId]
    ,JSON_QUERY([AdditionalInformation]) AS AdditionalInfo
FROM [Catalog].[Product]
WHERE [Title] = 'Forza Horizon 3: Hot Wheels'
FOR JSON PATH;
Here is what the result looks like:
{
                            "Id":3,
                            "Title":"Forza Horizon 3: Hot Wheels",
                            "Price":39.9900,
                            "CreationDate":"2017-06-15T13:48:00",
                            "Available":true,
                            "ProductCategoryId":3,
                            "AdditionalInfo":{
                            "Data": {
                            "baseImgUrl": "http://thegamesdb.net/banners/",
                            "Game": {
                            "id": "45998",
                            "GameTitle": "Forza Horizon 3: Hot Wheels",
                            "PlatformId": "4920",
                            "Platform": "Microsoft Xbox One",
                            "ReleaseDate": "05/09/2017",
                            "Overview": "Forza Horizon 3 Hot Wheels takes players to six new themed islands located off the coast of Australia; all connected by a network of Hot Wheels tracks – positioned hundreds of feet in the air – featuring classic Hot Wheels configurations like loops, corkscrews, and more. This is stunt driving at its most extreme, where you can master tracks by performing brand new Hot Wheels skills that make use of boost pads, high-bank turns, half-pipes, insane jumps, and even giant mechanical dinosaurs. If you’re looking to get creative, check out the new Stunt Swap feature to modify stunt track sections and dare your friends to try them.",
                            "ESRB": "E - Everyone",
                            "Genres": {
                            "genre": "Racing"
                },
                            "Players": "4+",
                            "Co-op": "Yes",
                            "Youtube": "http://www.youtube.com/watch?v=6-K_M4i2Bbs",
                            "Publisher": "Microsoft Studios",
                            "Developer": "Turn 10 Studios",
                            "Rating": "9",
                            "Images": {
                            "boxart": {
                            "-side": "front",
                            "-width": "1034",
                            "-height": "1344",
                            "-thumb": "boxart/thumb/original/front/45998-1.jpg",
                            "#text": "boxart/original/front/45998-1.jpg"
                    }
                }
            }
        }
    }
}
Here is an example for consuming the JSON output from within a C# controller action (using ADO.NET):
public IActionResult Product(int id)
{
    var queryWithForJson = $@"SELECT [Id]
        ,[Title]
        ,[Price]
        ,[CreationDate]
        ,[Available]
        ,[ProductCategoryId]
        ,JSON_QUERY([AdditionalInformation]) AS AdditionalInfo
    FROM dbo.[Product]
    WHERE [Id] = {id}
    FOR JSON PATH, INCLUDE_NULL_VALUES, WITHOUT_ARRAY_WRAPPER";

                            var conn = new SqlConnection("<your-connection-string>");
                            var cmd = new SqlCommand(queryWithForJson, conn);
    conn.Open();
                            var jsonResult = new StringBuilder();
                            var reader = cmd.ExecuteReader();
                            if (!reader.HasRows)
    {
        jsonResult.Append("[]");
    }
                            else
    {
                            while (reader.Read())
        {
            jsonResult.Append(reader.GetValue(0));
        }
    }

                            return new JsonResult(jsonResult.ToString());
}
Notice the additional FOR JSON parameters in the query.
INCLUDE_NULL_VALUES: If you don't specify this option, the output doesn't include JSON properties for NULL values in the query results.WITHOUT_ARRAY_WRAPPER: This removes the square brackets that surround the JSON output.
Consuming the above JSON result, using javascript. Notice how the additional game information is referenced:
$.get("/home/product/3").done(function(data) {
                            var product = JSON.parse(data);
                            $("#product-info").text(product.AdditionalInfo.Data.Game.GameTitle);
});
Make the app (even) more intelligent
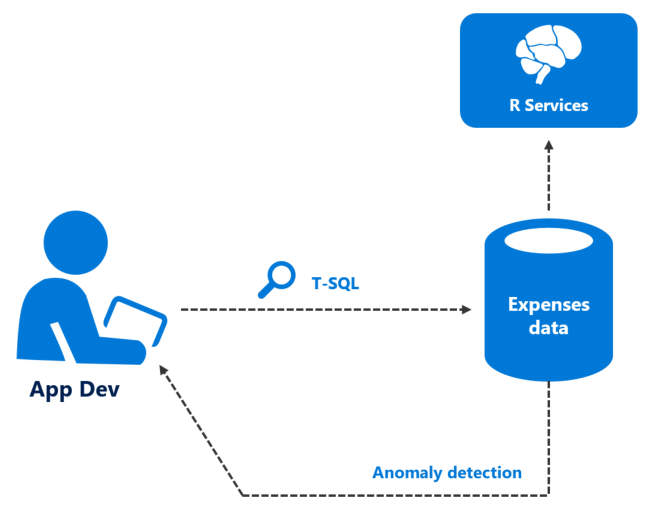
MyExpenses aims to be an intelligent application, and what we mean here by intelligence is the ability to learn and make decisions. In MyExpenses, this means that we are going to build a system for assessing expenses. Even though we assume the employees to be honest, sometimes they could make mistakes when adding a new expense (purposelessly or not).
Proposed solution: Use Machine Learning Services to access historical data and detect errors
SQL Server Machine Learning Services [first introduced in SQL Server 2016, and as of Nov 2017 available as preview for Azure SQL DB] provides a platform for developing and deploying intelligent applications that uncover new insights. You can use the rich and powerful R & Python languages and the many packages from the community to create models and generate predictions using your SQL Server data. Because ML Services integrates the languages with SQL Server, you can keep analytics close to the data and eliminate the costs and security risks associated with data movement.
You will find more information about ML Services in SQL Server in this link.
Since the MyExpenses team already has expertise in the R programming language, they opted to use that for executing their Machine Learning models.
The first step is to run SSMS and execute the following script to enable your instance to run R scripts in SQL Server:
EXEC sp_configure 'external scripts enabled', 1;
RECONFIGURE WITH OVERRIDE
MyExpenses has created and trained an ML model in R. Let's create a table to store the model in SQL:
DROP TABLE IF EXISTS suspiciousexpense_rx_models;
GO
CREATE TABLE suspiciousexpense_rx_models (
    model_name VARCHAR(30) NOT NULL DEFAULT('default model') PRIMARY KEY,
    model VARBINARY(MAX) NOT NULL
);
GO
Now they have saved their model as a binary object in the
suspiciousexpense_rx_models table. They also created a SQL stored procedure called
EvaluateExpense that takes an
ExpenseId to pull the expense record information, and evaluate it against the stored R model. They are ready to
create predictions using the model. To start, let's find the expenses with the highest amount:
select Id, Amount, ExpenseCategoryId
from Expense.Expense
where Amount > 1000
order by Amount desc
Id Amount ExpenseCategoryId
150 7964 2
360 7947 1
122 7312 2
...
...
Pick one of the top 10 results and execute the
EvaluateExpense procedure with the selected Id. The result will show 1 if suspicious, otherwise 0.
exec [Expense].EvaluateExpense 150IsSuspicious
1Try the Machine Learning exercise for yourself in the Developer Immersion lab.
Addressing Business Intelligence (BI) needs
One of MyExpenses' challenges is not having a centralized location to view reports across all businesses using the app, or narrowed down to a single business entity. To address the issues of fixed data storage and weak BI constraining data-driven decisions.
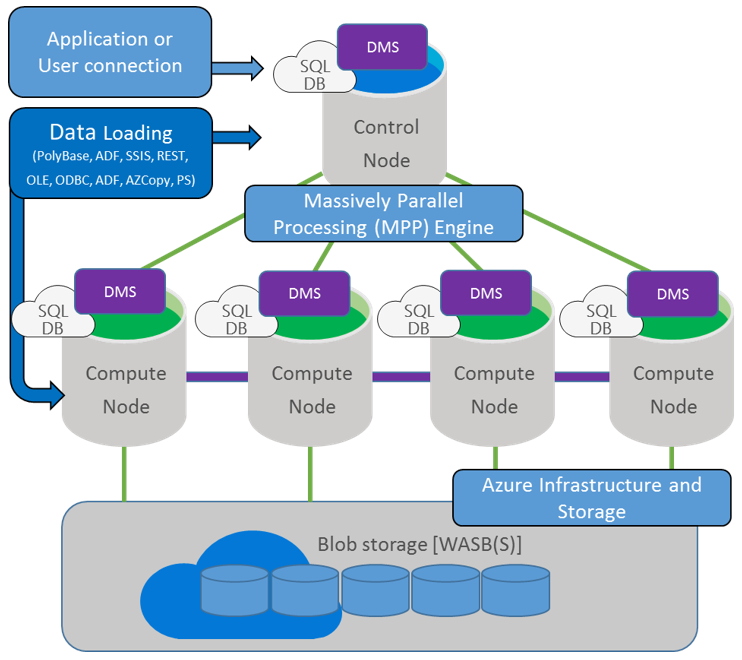
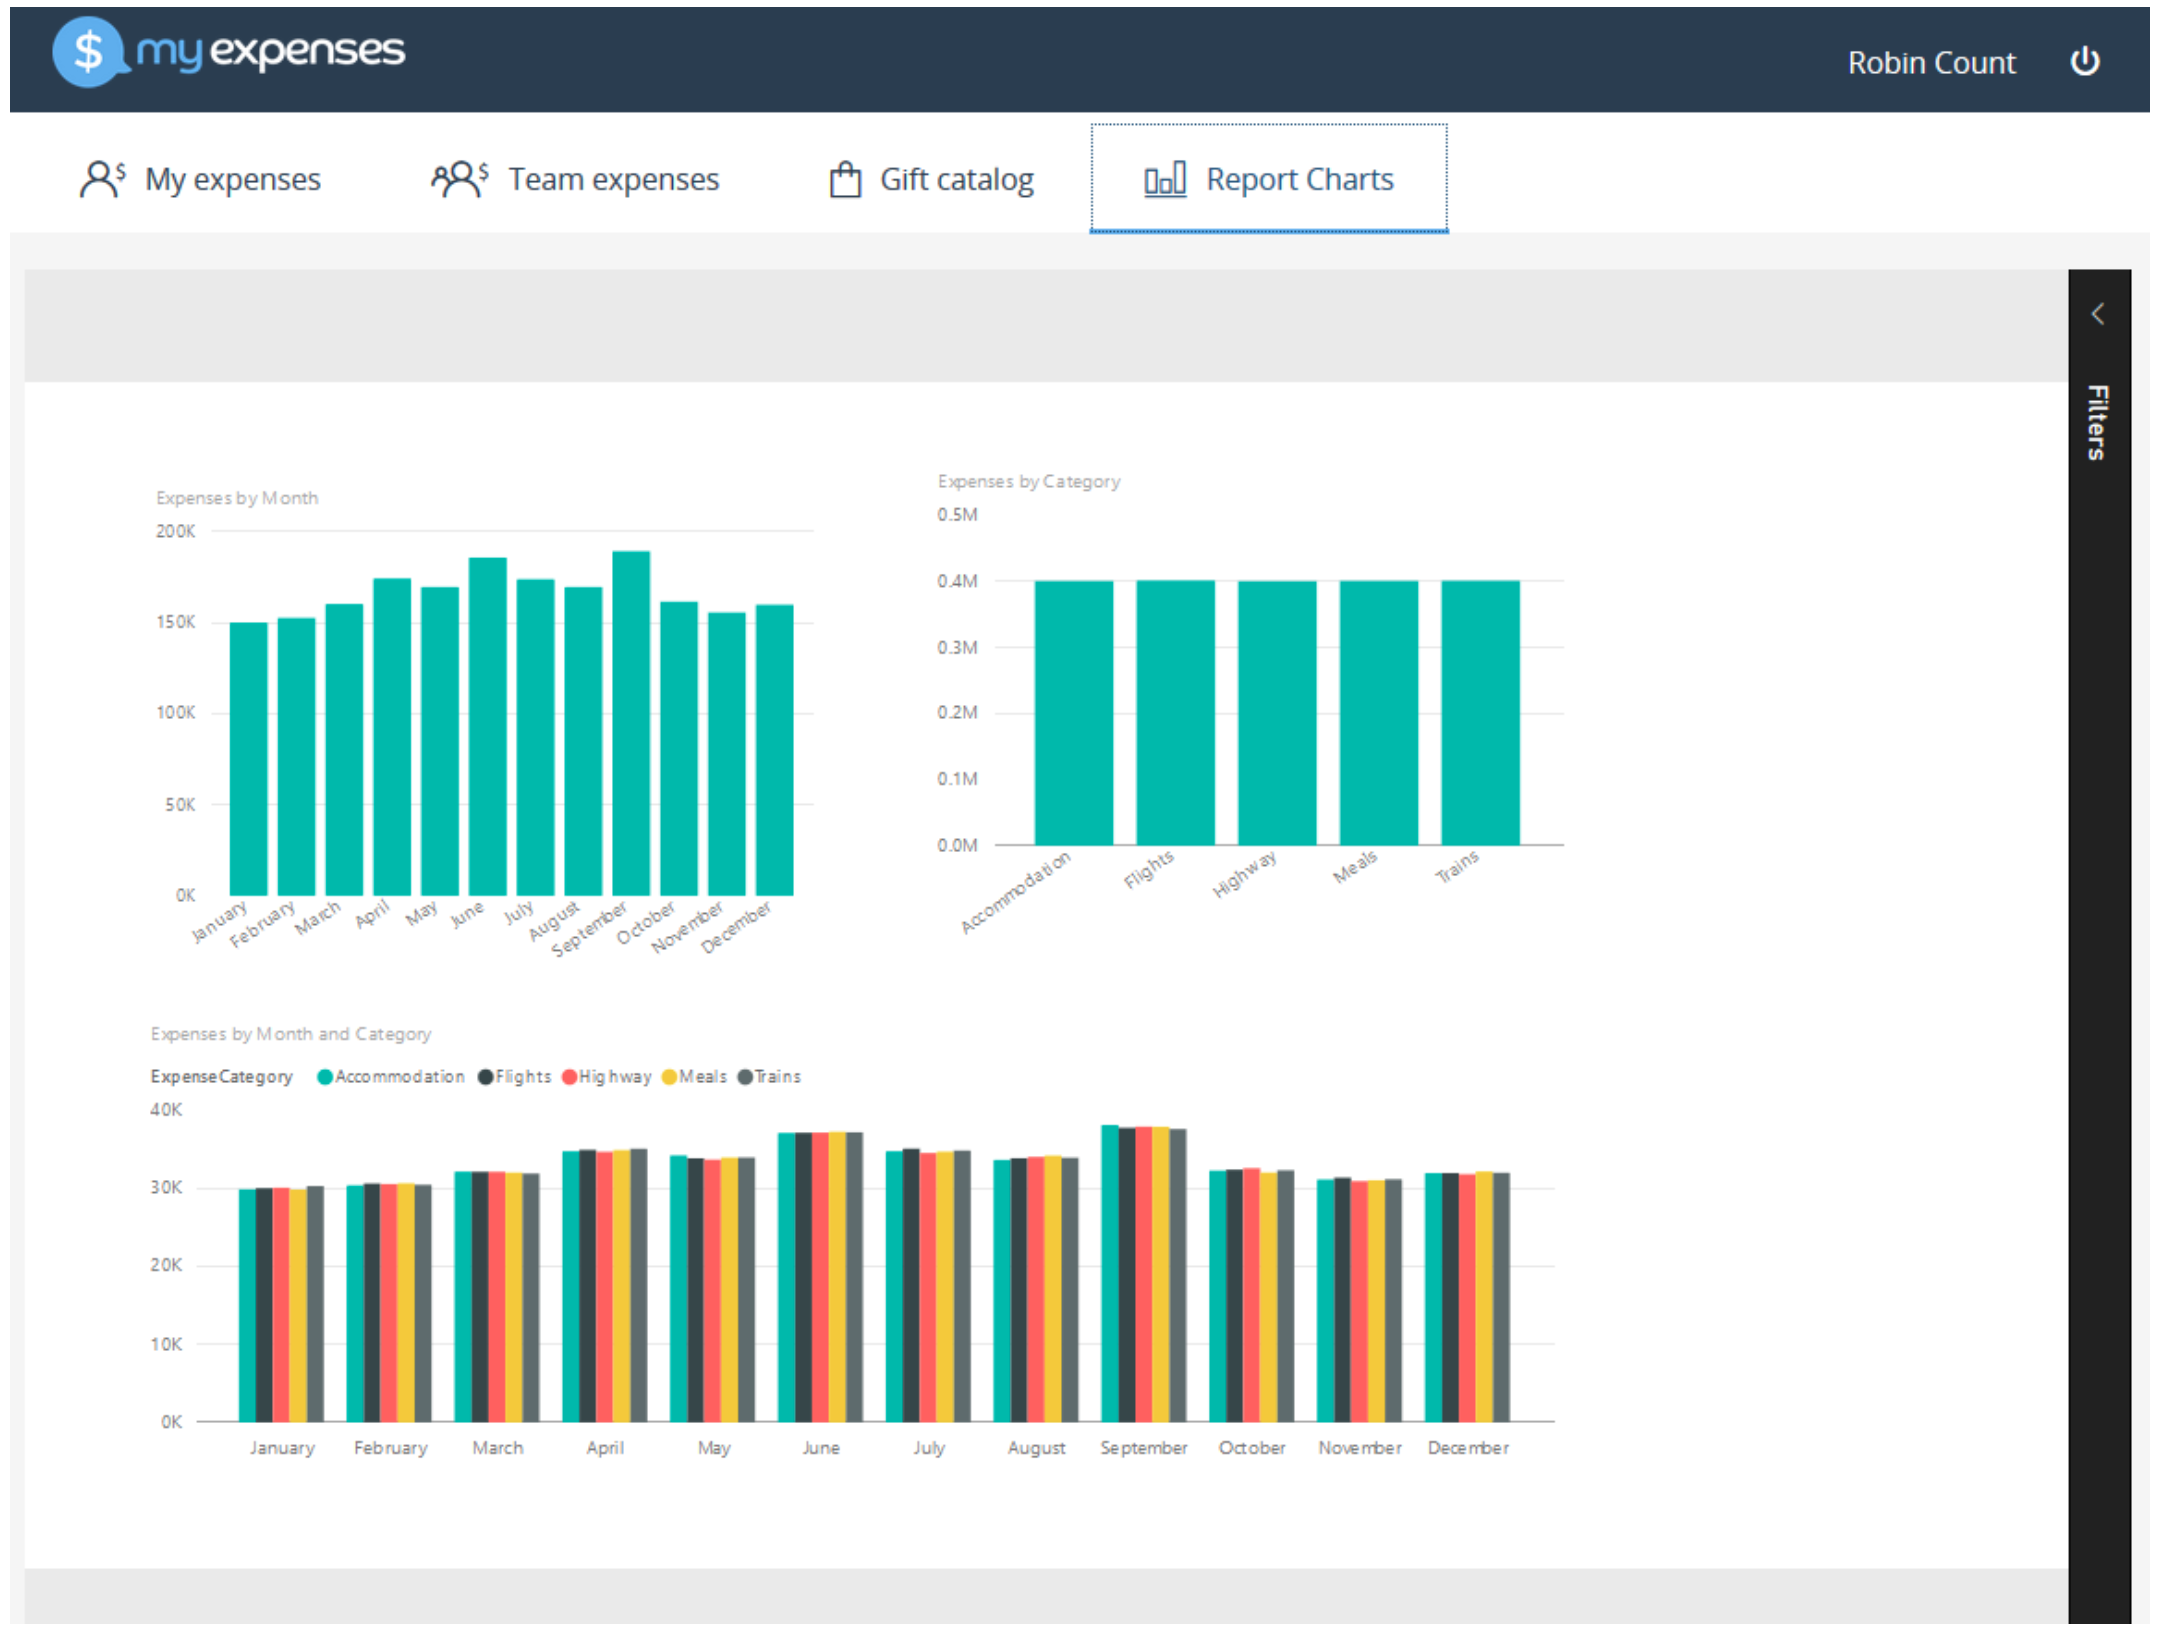
Proposed solution: Azure SQL DW and Power BI
The MyExpenses team is implementing Azure SQL Data Warehouse (SQL DW). Azure SQL Data Warehouse connected to a service such as Power BI, will provide good insight into total expenses per month, highest number of expenses by category, and other useful data.
Azure SQL Data Warehouse is a cloud-based, scale-out database capable of processing massive volumes of data, both relational and non-relational. Built on Microsoft's massively parallel processing (MPP) architecture, Azure SQL Data Warehouse can handle your enterprise workload.
- Combines the SQL Server relational database with Azure cloud scale-out capabilities. You can increase, decrease, pause, or resume compute in seconds. You save costs by scaling out CPU when you need it, and cutting back usage during non-peak times.
- Leverages the Azure platform. It's easy to deploy, seamlessly maintained, and fully fault tolerant because of automatic back-ups.
- Complements the SQL Server ecosystem. You can develop with familiar SQL Server Transact-SQL (T-SQL) and tools.
Azure SQL Data Warehouse uses the Microsoft massively parallel processing (MPP) architecture, designed to run some of the world's largest on-premises data warehouses. By combining MPP architecture and Azure storage capabilities, Azure SQL Data Warehouse can:
- Grow or shrink storage independent of compute.
- Grow or shrink compute without moving data.
- Pause compute capacity while keeping data intact.
- Resume compute capacity at a moment's notice.
Power BI Embedded is an Azure service that enables ISVs and app developers to surface Power BI data experiences within their applications. As a developer, you've built applications, and those applications have their own users and distinct set of features. Those apps may also happen to have some built-in data elements like charts and reports that can now be powered by Microsoft Power BI Embedded. Users don’t need a Power BI account to use your app. They can continue to sign in to your application just like before, and view and interact with the Power BI reporting experience without requiring any additional licensing.
Try the Power BI Embedded exercies for yourself in the Developer Immersion lab.
Sneak peak to cloud services that accelerate innovation
In the previous scenario, we migrated the on-premises SQL Server database to Azure SQL Database, so it is now fully cloud-based. This gives the MyExpenses team a chance to move their transactional application to the cloud, and modernize it by adding intelligence capabilities offered by various Azure services, such as Azure App Services, Azure Search, and Azure Machine Learning, which are better suited for a database on the cloud.
They have asked for guidance on which services they should use, and ideas for improvements that can be made quickly without too many changes to their application.
Idea! Scale apps elastically with spikes in demand
There are certain periods in which we have heavy spikes in demand. We cannot always anticipate these spikes, but it is difficult for us to handle the load when it happens. We don't know when we need to add more servers or remove them when the spikes subside. Also, we would like to make frequent updates to evolve our app. If there is a way to stage our updates, and to scale elastically to handle spikes in demand, that would help us really evolve our app.
Proposed solution: Re-architecting the app for the cloud
Hosting the web applications within Azure App Services will allow you to leverage the cloud for continous app updates. App Services use what are called deployment slots, which are live apps with their own hostnames. This means that you can swap between development, staging, and production deployment slots with no downtime (hot swap), swap configuration settings with the push of a button, allowing you to validate app changes, and even rollback changes to a production app after swapping. This can greatly reduce your deployment time, and give you assurance that your app is properly functioning on the cloud before committing to your deployment.
You will also gain the benefit of easily scaling your app to handle spikes in demand. You can either scale up by adding more CPU, memory, disk space, etc., or scale out by increasing the number of VM instances that run your app. The scale settings only take seconds to apply, and don't require any code changes or app redeployments.
Follow this link to learn more about scaling apps in Azure.
Idea! Cloud based Machine Learning
Following your prior guidance about adding smart error/fraud detection, using SQL Server ML services, our development team is very happy with their ability to detect mistakes, and wishes to migrate the capability to the cloud. As of Nov 2017, R support is in preview for Azure SQL DB Azure SQL Database, potentially you can migrate your R scripts, but there are more options if you are using Python or the R service is not available in your geo.
Proposed solution: Use Machine Learning as a service with Azure ML
Azure Machine Learning (Azure ML) is a fully managed cloud service that enables you to easily build, deploy, and share predictive analytics solutions. The machine learning process isn't especially simple. To make life easier for people doing machine learning, Azure ML provides several different components:
- ML Studio: A graphical tool that can be used to control the process from beginning to end.
- A set of data preprocessing modules.
- A set of machine learning algorithms.
- An Azure ML REST API that lets applications, in any programming language, access the chosen model once it's deployed on Azure.
Check the following link for more information about Azure Machine Learning.
Follow this link for more information on consuming Azure ML REST APIs.
Idea! Make expenses and gift catalog searchable
MyExpenses users are telling us that, as they add more and more expenses, it's getting more difficult for them to find specific expenses using our provided filters. For instance, they might not have the expense Id at hand or know the associated account number, but they do know the name of the item or location, or other details that we don't offer a filter for.
They also would like to easily search the gift catalog for specific items by name or description. Creating a search interface, as well as creating or integrating a search engine into our application will take more time than we'd like. Plus, we aren't exactly search experts.
Proposed solution: Add search capabilities using Azure Search
Azure Search is a cloud search-as-a-service solution that delegates server and infrastructure management to Microsoft, leaving you with a ready-to-use service that you can populate with your data and then use to add search functionality to your web or mobile application. Azure Search allows you to easily add a robust search experience to your applications using a simple REST API or .NET SDK without managing search infrastructure or becoming an expert in search.
Check the following link for more information about Azure Search.
The steps to get going are quite simple:
- Create a new Azure Search service in your Azure subscription.
- Use the Azure Search interface to import data from your Azure SQL Database.
- Create new search indexes: one for Products, and one for Expenses (Azure Search automatically recommends indexes for you to quickly get started).
- Create an indexer, which is a scheduler that makes sure your indexes are up-to-date.
From here, you have everything you need set up for search! You can use your Azure Search instance's search explorer to test queries and see what the results look like. All results are returned in JSON format so you can easily process them from within your app. A few modifications will need to be made within the MyExpenses app to call the Azure Search REST API to conduct searches against the indexes.
The code below consists of two methods in the MyExpenses Node.js web application which implement the search logic. The first
method,
getProducts accepts a search filter, results paging parameters, and a base Url for viewing product information.
It used to execute searches against the database directly, but the
azureSearchRequest method was added to call the Azure Search service API, accepting a
requestPath parameter that passes the extended path and querystring parameters to the Search API http endpoint.
As you can see,
getProducts calls
azureSearchRequest first with the
$countquery parameter to get the total number of products in the products index, followed by another call containing
the
$top,
$search, and the optional
$skip query parameters to retrieve the number of records, with the given filter, skipping the specified number
of records, respectively.
To use this code, be sure to replace
{YOUR_AZURE_SEARCH_NAME}and{YOUR_AZURE_SEARCH_KEY}with your Search API values.
let getProducts = function (filter, pageIndex, pageSize, baseUrl) {
                            let offset = pageIndex * pageSize;
                            // Search filter. '*' means to search everything in the index.
                            let search = filter ? filter : '*';
                            // Path that will be built depending on the arguments passed.
                            let searchPath = '/indexes/products/docs?api-version=2015-02-28&$top=' + pageSize + '&search=' + search;
                            // Request needed to get the total number of documents available, so pagination works as expected.
                            let totalCountPath= '/indexes/products/docs/$count?api-version=2015-02-28';

                            if (offset > 0) {
        searchPath += '&$skip=' + offset;
    }

                            return azureSearchRequest(totalCountPath).then(count => {
                            return azureSearchRequest(searchPath).then(responseString => {
                            var responseObject = JSON.parse(responseString);
                            // We map the values not to alter the buildProducts function.
                            var mappedResponse = responseObject.value.map((val) => ({
                id: val.Id,
                title: val.Title,
                price: val.Price,
                description: val.Description
            }));
                            return buildProducts(mappedResponse, pageIndex, pageSize, baseUrl, parseInt(count, 10));
        });
    });
};

let azureSearchRequest = function (requestPath) {
                            var options = {
        hostname: '{YOUR_AZURE_SEARCH_NAME}.search.windows.net',
        method: 'GET',
        path: requestPath,
        headers: {
                            'api-key': '{YOUR_AZURE_SEARCH_KEY}',
                            'Content-Type': 'application/json'
        },
    };

                            // Request to get the number of elements.

                            let deferred = new Promise((resolve, reject) => {
                            var req = https.request(options, function (res) {
                            res.setEncoding('utf-8');

                            var responseString = '';

                            res.on('data', function (data) {
                responseString += data;
            });

                            res.on('end', function () {
                            console.log(responseString);
                            resolve(responseString);
            });
        });

                            req.on('error', function (e) {
                            reject(e);
                            console.error(e);
        });

                            req.end();
    });

                            return deferred;
}
Learn more about configuring and using the Azure Search API with this Developer Immersion lab.
A note: Using containers and re-platforming the app
Application containerization
Given the current technology stack of the website, moving to Docker containers should be straightforward. In addition, SQL Server on Linux works well within a Docker container, so re-platforming the app will be one of the required steps (more on this in the next section). To support the containers, MyExpenses will be be using Azure Container Service and DC/OS. They also decided to move forward with Chef for infrastructure and container DevOps workflows.
The Azure Container Service deployment will be based on the DC/OS ARM template as shown here:
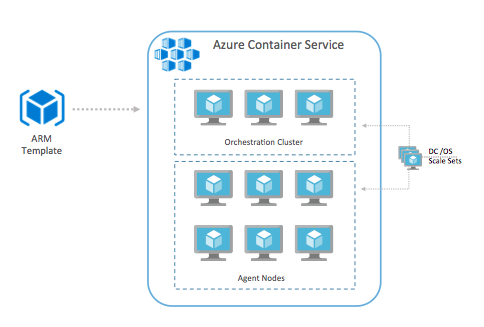
To cover the DevOps requirement for continuous integration and deployment workflows with the Azure Container Service infrastructure, we'll use Chef. Chef Automate contains a powerful and flexible continuous integration and deployment workflow engine. Workflows can be created for applications as well as the infrastructure itself. Some examples:
- Initial setup or updates to DC/OS. Chef cookbooks that specifically support the setup of DC/OS are available (https://github.com/chef-partners/dcos-cookbook).
-
Continuous integration and deployment of the application. The workflow is triggered when code is committed to the source code repository and typically performs the following steps:
- Build the software
- Run the automated tests
- Build the container images
- Push the container images to a Docker registry
- Automate updates to the Azure Container Service virtual machines. After the chef client has been installed on the virtual machines, cookbooks and recipes can be applied to the machines performing maintenance tasks such as upgrading the Docker engine or applying operating system updates. Cookbooks, which are kept under source control, can be applied manually or as part of a workflow triggered by a commit to the source control repository.
-
Scale the number of agent nodes in the Azure Container Service cluster. A Chef recipe can be used to increase or decrease the number of agent virtual machines in the agent scale set. The desired number of nodes is included as an attribute in the recipe. Changing the recipe and committing to source control could trigger a workflow which applies the recipe. Alternatively, the recipe can be applied manually.
Re-platforming the app
Let's assume that the MyExpenses team has decided to start using Docker containers to streamline their application development process through continuous integration, and to better support their multi-tenancy requirements. This decision was based on our recommendation in the previous scenario. Due to the technology stack of their web application, they are able to easily containerize their web solution. However, they are currently running SQL Server on a Windows-based VM. The good news is, SQL Server 2017, brings Microsoft’s industry-leading relational database engine to the enterprise Linux ecosystem. It is not a port or rewrite, so all of the advanced features they've been using on their Windows version are supported on Linux. Better yet, SQL Server on Linux runs great inside of a Docker container.
With full feature parity between SQL Server on Windows and Linux, you can quickly switch to SQL Server on Linux at any time, without much effort. Now the MyExpenses team has the ability to fully manage their application lifecycle in a completely automated way, quickly spinning up new instances of their infrastructure, including database, as needed.
Next Steps
- Real-time personalization interactive cloud app scenario
- Big Data and advanced analytics interactive cloud app scenario
- Developer Immersion "Developing with Data" labs on GitHub
- Create your Azure free account today
Resources
- SQL Server Temporal Tables
- In-Memory OLTP (In-Memory Optimization)
- Columnstore indexes
- Row-Level Security
- Dynamic Data Masking
- Always Encrypted (Database Engine)
- JSON Data (SQL Server)
- SQL Server Machine Learning Services (R Services)
- Azure SQL Database
- App Services deployment slots
- Scaling apps in Azure
- Azure Machine Learning
- Consuming Azure ML REST APIs
- Azure Search
- Power BI Embedded